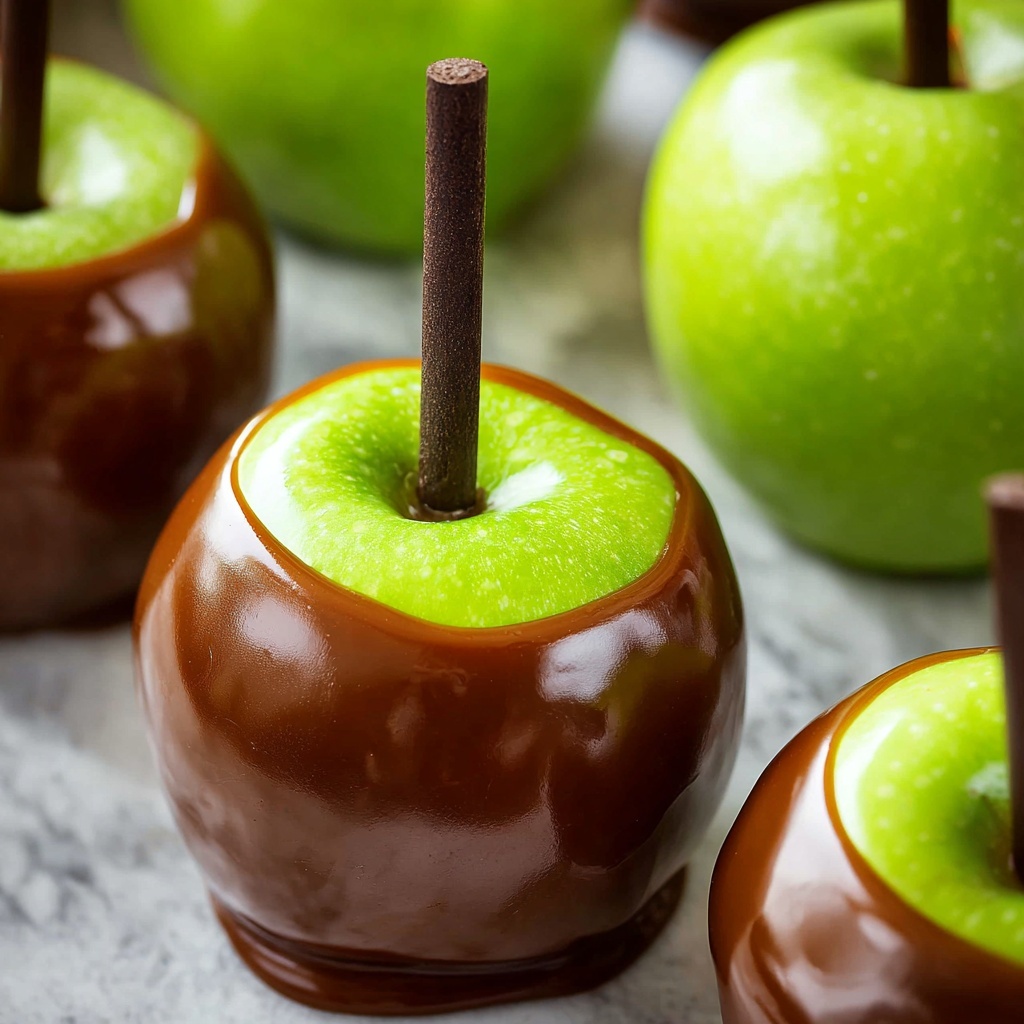
If you’ve been searching high and low for a treat that perfectly balances crisp, tart apples with melt-in-your-mouth caramel, look no further. I’m beyond excited to share The Best Caramel Apple Recipe, a delightful blend of homemade caramel and fresh Granny Smiths that will instantly transport you back to those joyful autumn memories. This recipe is your ticket to achieving a candy-shop worthy caramel apple that’s packed with flavor and irresistibly glossy, yet surprisingly simple to make at home. Whether you’re making these for a cozy family snack or a festive gathering, these apples never fail to bring a smile to everyone’s face.
Ingredients You’ll Need
It’s amazing how just a handful of straightforward ingredients can come together to create something so magical. Every component here plays a vital role — from the tartness of the apples to the rich sweetness of the caramel, and the variety of toppings that add texture and fun pops of flavor.
- 8 medium Granny Smith apples: Their tart crunch cuts perfectly through the sweetness of the caramel.
- 8 apple sticks (or any sturdy stick): Essential for dipping and comfy handling.
- 1/2 cup water: The base to dissolve sugar for caramelization.
- 4 cups white sugar: Builds a deep caramel flavor when cooked to amber perfection.
- 1/2 cup salted butter (chopped): Adds creaminess and a subtle salty contrast.
- 2 cups corn syrup: Keeps the caramel smooth and shiny.
- 2 (12-ounce cans) evaporated milk: Creates a luscious, creamy caramel consistency.
- 1 tablespoon vanilla extract: Infuses warmth and complexity into the caramel.
- 1 and 1/2 teaspoons kosher salt (or sea salt): Balances sweetness and enhances flavor layers.
- 1 (11-ounce) bag white chocolate chips: For an optional decadent chocolate coating.
- 1 teaspoon vegetable oil: Helps melt white chocolate smoothly.
- 2/3 cup granulated sugar: Mixed with cinnamon for a classic snickerdoodle topping.
- 2 tablespoons cinnamon: Adds cozy spice when combined with sugar for dipping.
- Variety of toppings: Sprinkles, chopped nuts, mini chocolate chips, mini M&Ms, crushed Oreos, crushed pretzels, toasted coconut, chopped Heath bar, toffee bits — personalizing your caramel apples just got so much fun!
How to Make The Best Caramel Apple Recipe
Step 1: Prep the Apples
Start by washing your apples thoroughly to remove the waxy coating that prevents caramel from sticking. Think of this step as priming your canvas — clean, dry apples set the stage for a flawless coating. After washing, dry completely and twist off the stems to prepare for stick insertion.
Step 2: Insert Sticks
Push your chosen sticks firmly about three-quarters down where the stem was or beside it. This ensures a solid hold while you dip and decorate. Don’t worry about fancy sticks; from popsicle sticks to chopsticks or even cleaned yard sticks, anything sturdy enough will do. If sticks break, a quick trick is to use a chopstick to widen the hole before inserting your final stick.
Step 3: Chill Your Apples
Pop your apples into the fridge for 20-30 minutes or longer. This step chills them just right, making them incredibly easy to dip and guaranteeing the caramel clings on beautifully. Bonus: it gives you time to get the caramel ready!
Step 4: Prepare Ingredients for Caramel
Before you heat anything, organize all your ingredients nearby—corn syrup, evaporated milk, butter, sugar—so you’re ready to work without a pause. Caramel making is all about timing and attention!
Step 5: Begin the Sugar Syrup
Pour water into a heavy-bottomed pot and swirl it to dampen the sides, then add sugar gently to the center. Gradually moisten the sugar with your wooden spoon, ensuring no crystals cling to the pot walls. This careful approach helps you achieve a smooth caramel base without gritty bits.
Step 6: Boil Without Stirring
Once boiling, reduce to medium heat and let the mixture bubble away undisturbed. Patience here is key; this step transforms the sugar into a golden amber caramel—a magical color change you will want to watch closely.
Step 7: Watch for Color and Smoke
As the sugar darkens to amber, gently swirl the pot to even out the heat and observe the first hints of smoke, signaling caramel readiness. Remove from heat immediately to avoid burning—this moment makes the difference between burnt sugar and luscious caramel.
Step 8: Add Butter and Corn Syrup
Off the heat, whisk in the butter piece by piece, handling cautiously as hot caramel can splatter. Once creamy, stir in the corn syrup, return to medium heat, and bring it to a smooth boil, scraping the pot well to prevent lumps.
Step 9: Slowly Incorporate Evaporated Milk
This stage calls for slow, careful mixing. Gradually whisk in the evaporated milk over about 10 minutes to ensure a silky texture. Rushing here can make the caramel grainy, so savor the process.
Step 10: Boil to Temperature
Boil the caramel for 20-25 minutes, whisking frequently and monitoring with a candy thermometer until it reaches 238°F. This precise temperature guarantees that perfect coating consistency for your apples.
Step 11: Final Flavorings and Cooling
Remove from heat, add salt and vanilla for a depth of flavor that will make this truly The Best Caramel Apple Recipe ever. Let the caramel cool slightly, stirring occasionally to prevent lumps, while you prepare your dipping station.
Step 12: Set Up Dipping Station and Toppings
Lay out a silpat or similar non-stick mat (trust me, parchment or foil is a no-go!) and organize your toppings in small bowls. This is where your creativity shines—whether it’s classic nuts or fun crushed candies, let your imagination run wild.
Step 13: Dip the Apples
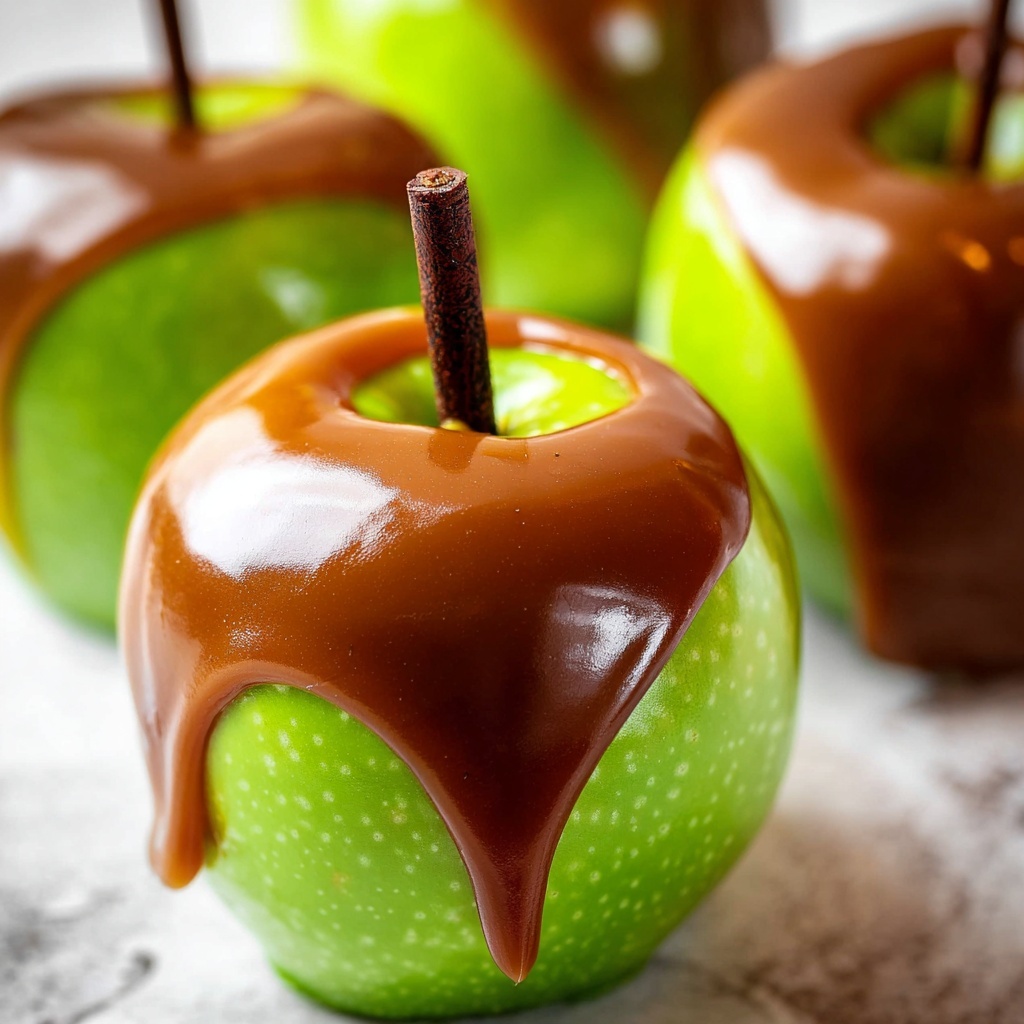
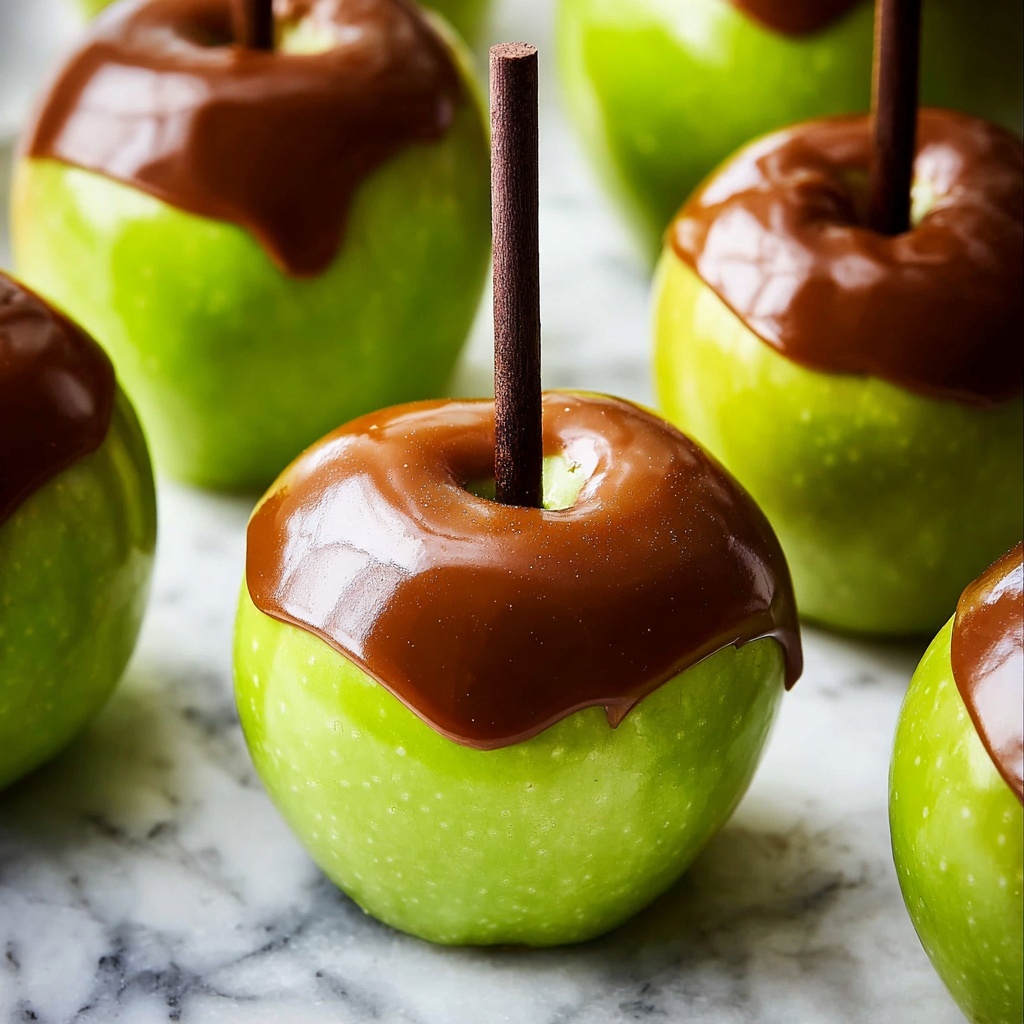
Hold chilled apples by the sticks and dip into warm caramel, swirling to coat evenly. Let excess drip off, scrape gently on the pan edge, then either set directly on the mat or, if adding toppings, roll the apple immediately to get an even layer of extras.
Step 14: Optional Chocolate Coating and Toppings
For an extra showstopper, dip your caramel-coated apples in melted white chocolate enhanced with vegetable oil for smoothness, then sprinkle toppings on top. Chilling the caramel layer first helps the chocolate hold perfectly without melting the caramel.
Step 15: Let Apples Set
Set your beautifully dipped apples aside to fully set before slicing. This patience ensures that every bite holds together with the ideal caramel-to-apple ratio.
Step 16: Slice and Serve
When ready to enjoy, remove the sticks, slice the apples in halves and then wedges, carefully trimming out the cores. This makes sharing simple and keeps each bite perfectly balanced.
How to Serve The Best Caramel Apple Recipe
Garnishes
The perfect caramel apple is always enhanced by thoughtful garnishes. Sprinkles add a playful pop of color; chopped nuts bring delicious crunch; and crushed pretzels or Oreos introduce surprising textures. I love the snickerdoodle feel of a cinnamon sugar finish over a white chocolate coating—it’s like fall in every bite!
Side Dishes
Caramel apples can be a star player or part of a larger dessert spread. Pair them with warm apple cider, a scoop of vanilla ice cream, or even alongside a rich pumpkin cheesecake for a festive spread that everyone will adore. They also work wonderfully with salty snacks to balance the sweetness.
Creative Ways to Present
Presentation is half the fun. Arrange the apples on a rustic wooden board or stand them upright in a vase filled with dried corn husks or popcorn kernels to evoke a harvest vibe. Wrapping each in clear cellophane tied with twine or colorful ribbons makes them perfect for gifting or party favors.
Make Ahead and Storage
Storing Leftovers
If you have leftovers, keep the whole caramel apples refrigerated for up to 2-3 days. Slice the apples only when ready to serve to maintain their freshness, but once sliced, consume within 1-2 days to enjoy the best texture.
Freezing
Technically, you can freeze caramel apples, but be warned that the texture of the apple may become mushy upon thawing. If you want to freeze, it’s better to freeze the caramel separately and dip fresh apples when ready to serve.
Reheating
Leftover caramel stored in a jar at room temperature can be gently reheated in the microwave for a quick drizzle over ice cream or desserts. Warm it in short bursts and stir frequently to avoid burning. For the best quality, use leftover caramel within two weeks or refrigerate for longer storage.
FAQs
Can I use different types of apples for this recipe?
Absolutely! While Granny Smith apples are classic for their tartness and firmness, you can try Fuji, Honeycrisp, or Gala for a sweeter twist. Just keep in mind that softer apples may not hold up as well under the weight of the caramel.
How do I prevent caramel from slipping off the apples?
Removing the apple’s wax coating is key, so wash thoroughly and dry well. Chilling the apples before dipping also helps the caramel adhere better, creating a firm and even coating.
Is there a way to make salted caramel apples with this recipe?
Definitely! This recipe already includes kosher salt in the caramel for a nice balance. For extra flair, sprinkle flaky sea salt over the caramel immediately after dipping and before it sets for that perfect salted caramel treat.
Can I make these caramel apples nut-free?
Yes! Simply skip the nuts and use toppings like sprinkles, crushed pretzels, or mini chocolate chips to add texture without nuts. Always double-check topping ingredients for allergens if you’re serving to guests with sensitivities.
How long does it take for the caramel to set on the apples?
Setting usually takes about 30 minutes at room temperature. Refrigerating for 10-20 minutes after dipping speeds up the process and helps coatings like chocolate adhere better before adding toppings.
Final Thoughts
Trust me when I say that making The Best Caramel Apple Recipe at home is an absolute joy and a genuine crowd-pleaser. The process is as satisfying as the result — rich, creamy caramel clinging to crisp apples and glowing with the toppings you love most. So gather your sticks, choose your toppings, and dive into this sweet adventure. You’ll wonder why you ever settled for store-bought after tasting these!
Print
The Best Caramel Apple Recipe
- Prep Time: 5 minutes
- Cook Time: 23 minutes
- Total Time: 28 minutes
- Yield: 16 caramel apples
- Category: Dessert
- Method: Stovetop
- Cuisine: American
Description
This Best Caramel Apple Recipe delivers perfectly tart Granny Smith apples dipped in a homemade smooth, creamy caramel that sets beautifully for a classic treat. The caramel is cooked carefully on the stovetop to achieve the perfect amber color and smooth texture. Dip the apples in caramel, then optionally coat with chocolate and a variety of toppings for a customizable indulgence. These caramel apples are perfect for fall, Halloween, or any festive occasion, offering a delicious combination of sweet and tart with a satisfying crunch.
Ingredients
Apples & Sticks
- 8 medium Granny Smith apples (or your favorite tart apple)
- 8 apple sticks (or popsicle sticks, kebab sticks, lollipop sticks, chopsticks, or cleaned yard sticks)
Caramel
- 1/2 cup water
- 4 cups white sugar
- 1/2 cup salted butter, chopped (1 stick)
- 2 cups corn syrup
- 2 (12-ounce) cans evaporated milk
- 1 tablespoon vanilla extract
- 1 and 1/2 teaspoons kosher salt (or sea salt)
Chocolate Coating (Optional)
- 1 (11-ounce) bag white chocolate chips (or semi sweet or butterscotch chips)
- 1 teaspoon vegetable oil
Toppings (Optional)
- 2/3 cup granulated sugar
- 2 tablespoons cinnamon
- Sprinkles
- Chopped nuts
- Mini chocolate chips
- Mini M&Ms
- Crushed Oreos
- Crushed pretzels
- Toasted coconut
- Chopped Heath bar
- Toffee bits
Instructions
- Prep the apples: Wash apples thoroughly to remove the wax coating that prevents caramel adhesion. Twist off stems and dry completely to ensure caramel sticks well.
- Insert sticks: Push sticks about 3/4 of the way into the top of each apple where the stem was removed, using any suitable stick.
- Chill apples: Refrigerate the apples for at least 20-30 minutes to make them easier to dip and help caramel stick better.
- Prepare caramel ingredients: Measure corn syrup, shake evaporated milk cans, and chop butter into pieces so they are ready for cooking.
- Start caramel base: Add 1/2 cup water to a heavy-bottomed 3-quart pot and swirl to wet the sides. Heat over high.
- Add sugar carefully: Slowly pour 4 cups sugar into center of pot, avoiding sugar crystals on sides. Moisten sugar completely with a wooden spoon, ensuring no crystals remain on sides.
- Boil sugar: Bring mixture to a boil over high heat while stirring. Once boiling, reduce to medium heat and allow to boil undisturbed for 8-10 minutes until color starts to change.
- Watch caramel color: Monitor as the sugar mixture transitions from light yellow to deep amber, rotating the pan if needed for even coloring.
- Remove at amber stage: When caramel is evenly amber with first wisps of smoke, immediately remove from heat to avoid burning.
- Add butter off-heat: Whisk in chopped butter carefully. Caramel will thicken and become creamy; be cautious of hot splashes.
- Incorporate corn syrup: Add 2 cups corn syrup, whisk thoroughly, then return pot to medium heat to bring back to a boil.
- Add evaporated milk slowly: Gradually whisk in evaporated milk over at least 10 minutes to maintain a smooth texture.
- Boil caramel mixture: Continue boiling while whisking for 20-25 minutes until mixture reaches 238°F (soft-ball stage) on a candy thermometer.
- Remove from heat: Take pot off burner at 238°F and let settle, occasionally stirring edges and corners to prevent burning but avoid excessive aeration.
- Season caramel: Stir in 1 and 1/2 teaspoons kosher salt and 1 tablespoon vanilla extract, allowing any bubbling to subside while mixing.
- Cool caramel and prep dipping station: Let caramel cool about 15 minutes, stirring occasionally, while laying out a Silpat mat and preparing toppings in separate bowls.
- Prepare toppings: Mix cinnamon sugar by combining 2/3 cup sugar with 2 tablespoons cinnamon if making Snickerdoodle-style apples. Arrange additional toppings as desired.
- Dip apples in caramel: Holding chilled apples by sticks, submerge in warm caramel coating evenly, letting excess drip off and scraping bottom edge of pot gently.
- Set caramel-only apples: Place dipped apples directly onto Silpat mat to set if using no other toppings.
- Add toppings directly: For apples without chocolate coating, immediately roll dipped apples in chosen toppings before setting on Silpat.
- Chocolate coating (optional): Refrigerate dipped apples for 10-20 minutes until caramel is firm. Melt white chocolate chips with vegetable oil in short microwave bursts, stirring until smooth. Quickly dip caramel apples in chocolate coating, then in additional toppings as desired. Place on Silpat.
- Let apples set completely: Allow caramel and chocolate coatings to fully set before slicing or serving.
- Slice apples: Remove sticks, cut apples in halves, lay flat, cut into wedges, then trim core pieces from wedges.
- Storage: Keep whole caramel apples refrigerated for 2-3 days, and sliced apple pieces refrigerated for 1-2 days. Store leftover caramel at room temperature up to 2 weeks or refrigerated up to 6 months.
Notes
- Use thick, heavy-bottomed pots for making caramel to avoid burning and uneven cooking.
- Remove wax from apples for better caramel adhesion.
- Slow addition of evaporated milk is critical for smooth caramel texture.
- Use a Silpat mat to prevent caramel from sticking when setting the apples.
- Adjust salt amount to taste; start with less if using table salt instead of kosher or sea salt.
- Careful temperature monitoring during caramel cooking prevents burnt or overly hard caramel.
- Various toppings can be used to customize flavors and textures, including nuts, sprinkles, and crushed candies.
- Adding vegetable oil to melted chocolate chips helps achieve a smoother chocolate coating.
- Leftover caramel can be reheated gently and used as a sauce.


