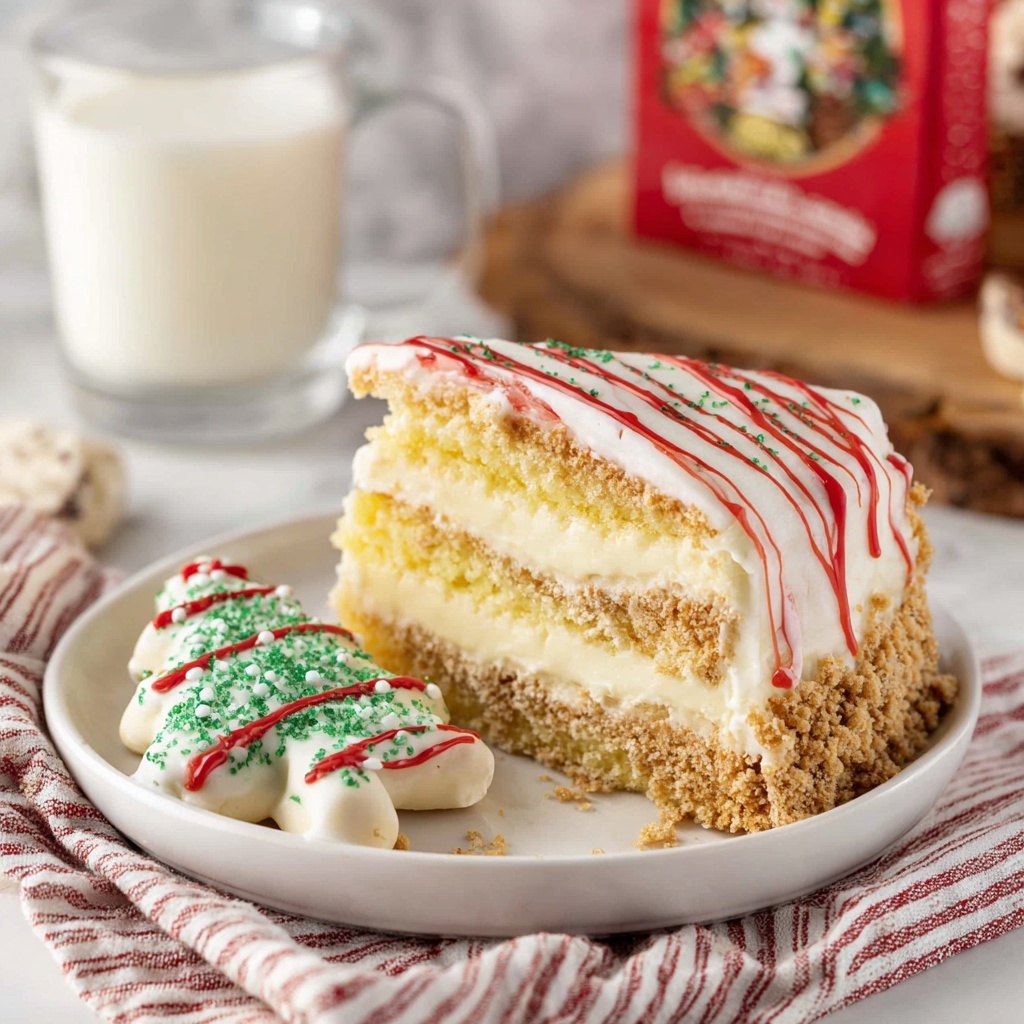
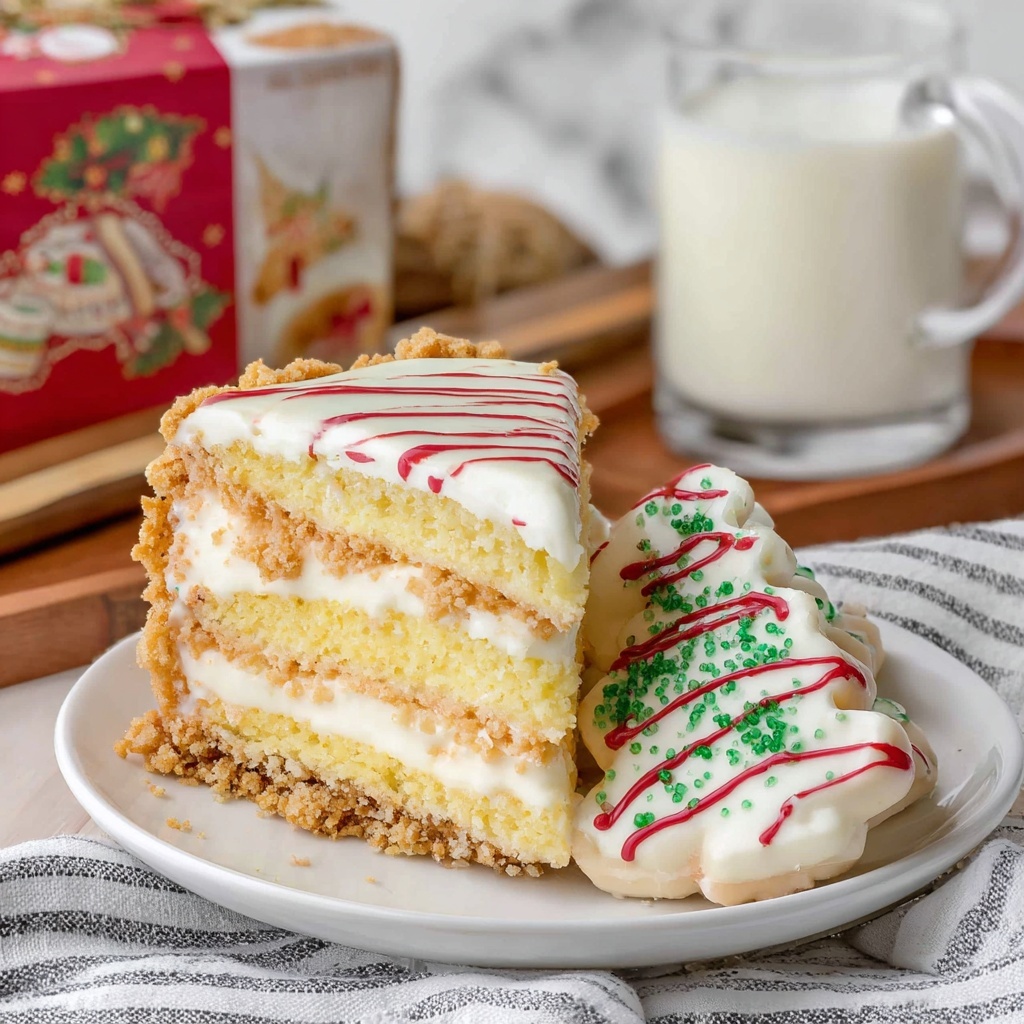
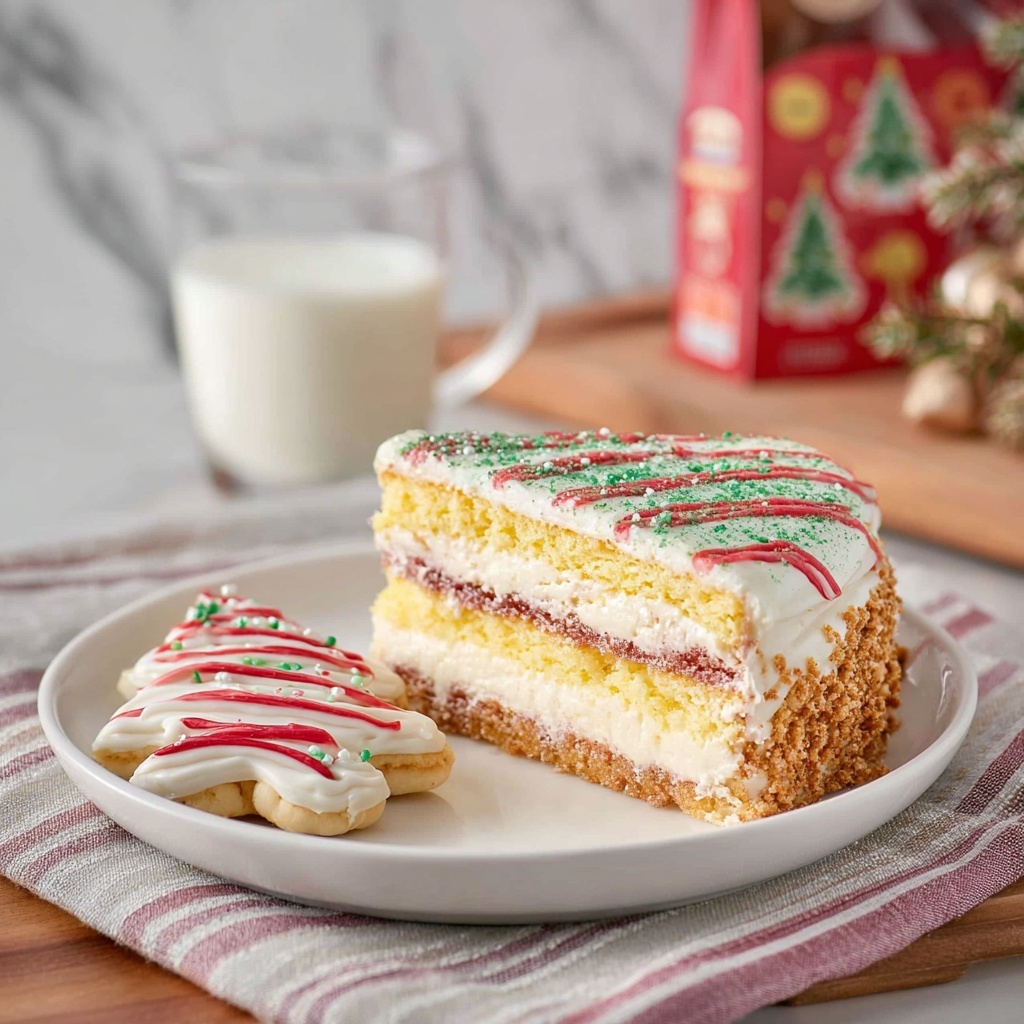
If you’ve ever been on the hunt for a dessert that perfectly captures the festive spirit with a delightful twist, the Little Debbie Christmas Tree Cheesecake Recipe is exactly what you need. This no-bake cheesecake dazzles with layers of creamy, dreamy filling, the nostalgic charm of Little Debbie Christmas Tree Cakes nestled right in the middle, and a luscious white chocolate ganache topping sparkling with red icing and green sanding sugar. It’s joy on a plate, combining ease and elegance for an unforgettable holiday treat that you’ll be excited to share again and again.
Ingredients You’ll Need
Getting ready to whip up this festive cheesecake is a breeze because the ingredients are straightforward yet crucial to the texture and flavor of the final masterpiece. Each component brings its own magic, from the crunchy graham cracker crust to the rich cream cheese filling, and of course, the star of the show, those charming Christmas Tree Cakes.
- 1 ½ cups graham cracker crumbs: Provides a crunchy, buttery base that balances the creamy filling perfectly.
- ⅓ cup melted butter: Binds the graham cracker crumbs to form a sturdy crust.
- 4 blocks cream cheese (8-ounce each, softened): Adds the silky, tangy foundation essential for that classic cheesecake texture.
- ½ cup granulated sugar: Sweetens the cream cheese filling just right without overpowering it.
- 2 cups heavy whipping cream: Whipped to fluffy perfection, it lightens the filling for an airy feel.
- 1 box Little Debbie Christmas Tree Cakes (5-count): Delivers festive flavor and nostalgic fun while blending seamlessly into the cheesecake.
- 8 ounces chopped white chocolate: Creates a rich, creamy ganache topping that adds indulgent sweetness.
- ½ cup heavy cream (for ganache): Heated and combined with white chocolate to form a smooth glaze.
- Store-bought red decorating icing: Used for festive drizzling, adding a pop of color and extra holiday cheer.
- Green sanding sugar: Sprinkled on top for a sparkling finish reminiscent of shimmering Christmas tree decorations.
How to Make Little Debbie Christmas Tree Cheesecake Recipe
Step 1: Make the Crust
Start by combining the graham cracker crumbs and melted butter in a bowl, stirring until the mixture holds together well. Firmly press it into the bottom of a 9-inch springform pan—this will be the sturdy, buttery base that supports all those dreamy layers. Pop it into the fridge to chill while you work on the filling.
Step 2: Prepare the Cream Cheese Mixture
In a large bowl, beat the softened cream cheese and sugar using an electric mixer until velvety smooth and creamy—no lumps allowed! This is the rich, tangy heart of your cheesecake that gives every bite a luscious depth of flavor.
Step 3: Whip the Cream and Fold
In a separate bowl, whip the heavy cream until stiff peaks form. This step is key for a light, fluffy texture. Gently fold the whipped cream into the cream cheese mixture with care, so you keep that airy loft while melding the two perfectly.
Step 4: Layer Half the Filling
Spread half of the cheesecake mixture evenly over your chilled crust. This layer acts as a smooth canvas for the famous Little Debbie Christmas Tree Cakes.
Step 5: Add the Christmas Tree Cakes
Arrange the Little Debbie Christmas Tree Cakes in a single layer atop the filling. Press them down lightly so they nestle into the cheesecake, infusing festive fun and moist cake sweetness right into the middle.
Step 6: Top with Remaining Filling
Spread the remaining cheesecake mixture over the Christmas Tree Cakes, smoothing the surface gently with a spatula. This seals in the festive layer and creates a perfect top for the ganache.
Step 7: Chill Until Firm
Cover the pan and refrigerate for at least 6 hours, or better yet, overnight. This chilling time lets the cheesecake set beautifully so every slice holds together with creamy finesse.
Step 8: Make the White Chocolate Ganache
Heat ½ cup heavy cream in the microwave until it’s just steaming. Pour it over the chopped white chocolate in a bowl and let it sit quietly for 2 minutes. Then stir gently until the mixture is perfectly smooth and glossy. Allow it to cool slightly so it won’t melt the chilled cheesecake layer.
Step 9: Pour the Ganache
Pour the cooled white chocolate ganache atop the set cheesecake and smooth it out evenly. This silky topping adds a luscious layer of sweet, creamy decadence that ties the whole dessert together.
Step 10: Decorate Festively
Drizzle store-bought red decorating icing in a fun zigzag pattern over the ganache. Then sprinkle the green sanding sugar generously on top. These finishing touches bring the colors of the season to life and give the cheesecake that wow factor.
Step 11: Final Chill and Serve
Return the cheesecake to the fridge for 30 minutes to let the topping set firmly. Then slice into generous portions and serve it chilled, ready to impress and delight your guests.
How to Serve Little Debbie Christmas Tree Cheesecake Recipe
Garnishes
To enhance the festive vibe, add a few sprigs of fresh mint or a handful of fresh cranberries around the serving plate. These natural garnishes complement the colors on the cheesecake and add a fresh bite between rich mouthfuls.
Side Dishes
This cheesecake pairs wonderfully with light accompaniments like a crisp orange or cinnamon-infused whipped cream. Fresh fruit slices such as kiwi or pomegranate seeds also add brightness that balances the richness beautifully.
Creative Ways to Present
For a show-stopping holiday dessert table, slice the cheesecake into individual squares and place each piece in a mini cupcake liner. You can also serve it on vibrant holiday-themed plates with a dusting of powdered sugar or edible gold glitter for that extra sparkle.
Make Ahead and Storage
Storing Leftovers
Because this cheesecake is rich and creamy, store any leftovers tightly covered in the refrigerator. It will stay fresh for up to 4 days without losing its creamy texture or festive appeal.
Freezing
If you’d like to keep it longer, you can freeze individual slices wrapped in plastic wrap and then foil. Freeze for up to 2 months. When ready to enjoy, thaw slices overnight in the fridge for the best texture.
Reheating
Since this is a no-bake, chilled cheesecake, reheating is not recommended. Instead, serve it cold and enjoy the perfect creamy coolness that makes it so special.
FAQs
Can I substitute other Little Debbie cakes?
Absolutely! While the Christmas Tree Cakes give a unique festive touch in the Little Debbie Christmas Tree Cheesecake Recipe, other Little Debbie varieties like Swiss Roll or Fudge Round could add delicious variation.
Do I need a springform pan?
Using a springform pan makes removing the cheesecake much easier without disturbing the layers. If you don’t have one, a regular round pan lined generously with parchment paper can work but handle gently.
Can I use flavored cream cheese?
Plain cream cheese is best to keep the classic cheesecake flavor balanced with the sweetness of the cakes and ganache. However, a mild flavor like vanilla could add a nice twist without overpowering the recipe.
Is this recipe gluten-free?
The crust and the Little Debbie Christmas Tree Cakes contain gluten, so this recipe isn’t gluten-free. For a gluten-free version, you could try substituting with gluten-free graham crackers and finding a similar gluten-free festive cake.
How long does the cheesecake need to chill?
For the best texture, chill the cheesecake for at least 6 hours or overnight. This allows it to set firm and lets the flavors meld beautifully, making every slice a creamy delight.
Final Thoughts
If you want to bring joy and delight to your holiday table without spending hours in the kitchen, you simply must try the Little Debbie Christmas Tree Cheesecake Recipe. It’s the perfect balance of sweet, creamy, and festive with a dash of childhood nostalgia, guaranteed to become a treasured part of your seasonal traditions. Trust me, once you dig in, you’ll be hooked for many Christmases to come!
Print
Little Debbie Christmas Tree Cheesecake Recipe
- Prep Time: 25 minutes
- Cook Time: 0 minutes
- Total Time: 6 hours 25 minutes (including chilling time)
- Yield: 10 slices
- Category: Dessert
- Method: No-Cook
- Cuisine: American
- Diet: Vegetarian
Description
This festive Little Debbie Christmas Tree Cheesecake is a no-bake dessert that’s perfect for holiday gatherings. Featuring a graham cracker crust, creamy whipped cheesecake filling, and topped with iconic Christmas Tree Cakes, white chocolate ganache, and colorful red and green decorations, this easy-to-make cheesecake is both visually delightful and deliciously rich.
Ingredients
Crust
- 1 ½ cups graham cracker crumbs
- ⅓ cup butter (melted)
Cheesecake Filling
- 4 blocks cream cheese (8-ounce blocks, softened to room temperature)
- ½ cup granulated sugar
- 2 cups heavy whipping cream
Topping
- 1 box Little Debbie Christmas Tree Cakes (5-count box)
- 8 ounces white chocolate (chopped)
- ½ cup heavy cream
- Store-bought red decorating icing (for drizzling)
- Green sanding sugar
Instructions
- Prepare the crust: Combine the graham cracker crumbs and melted butter in a bowl and stir until well mixed. Press the mixture firmly into the bottom of a 9-inch springform pan to form an even crust. Place the crust in the fridge to chill while preparing the filling.
- Make the cream cheese mixture: In a large bowl, use an electric mixer to beat the softened cream cheese and granulated sugar together until smooth and creamy, ensuring no lumps remain.
- Whip heavy cream: In a separate chilled bowl, whip the heavy cream until stiff peaks form, then gently fold the whipped cream into the cream cheese mixture until fully combined and fluffy, careful not to deflate it.
- Assemble first layer: Spread half of the cheesecake mixture evenly over the chilled graham cracker crust, smoothing the surface gently.
- Add Christmas Tree Cakes: Arrange the Little Debbie Christmas Tree Cakes in a single layer on top of the cheesecake filling. Press them down slightly into the filling to secure.
- Top with remaining cheesecake mixture: Spread the remaining cheesecake mixture over the Christmas Tree Cakes, smoothing the surface evenly with a spatula for a clean finish.
- Chill to set: Cover the pan and refrigerate the cheesecake for at least 6 hours, preferably overnight, to allow it to firm up fully.
- Prepare white chocolate ganache: Heat the ½ cup heavy cream in the microwave until just steaming. Pour the hot cream over the chopped white chocolate and let it sit for 2 minutes. Stir gently until smooth and well combined. Allow to cool slightly before using.
- Apply ganache topping: Pour the slightly cooled white chocolate ganache over the chilled cheesecake and smooth the top with a spatula.
- Decorate: Drizzle store-bought red decorating icing in a zigzag pattern over the ganache, then sprinkle green sanding sugar evenly on top for festive color and texture.
- Final chill and serve: Return the cheesecake to the fridge for 30 minutes to set the topping before slicing. Serve chilled for best texture and flavor.
Notes
- Make sure the cream cheese is softened to room temperature to ensure a smooth and lump-free filling.
- Whip the heavy cream in a cold bowl to achieve stiff peaks more easily.
- Allow the cheesecake to chill overnight for the best texture and flavor.
- The white chocolate ganache should be slightly cooled before pouring to avoid melting the cheesecake layers.
- Use a sharp knife warmed in hot water to slice the cheesecake neatly.
- Store the cheesecake covered in the refrigerator and consume within 3-4 days for freshness.


