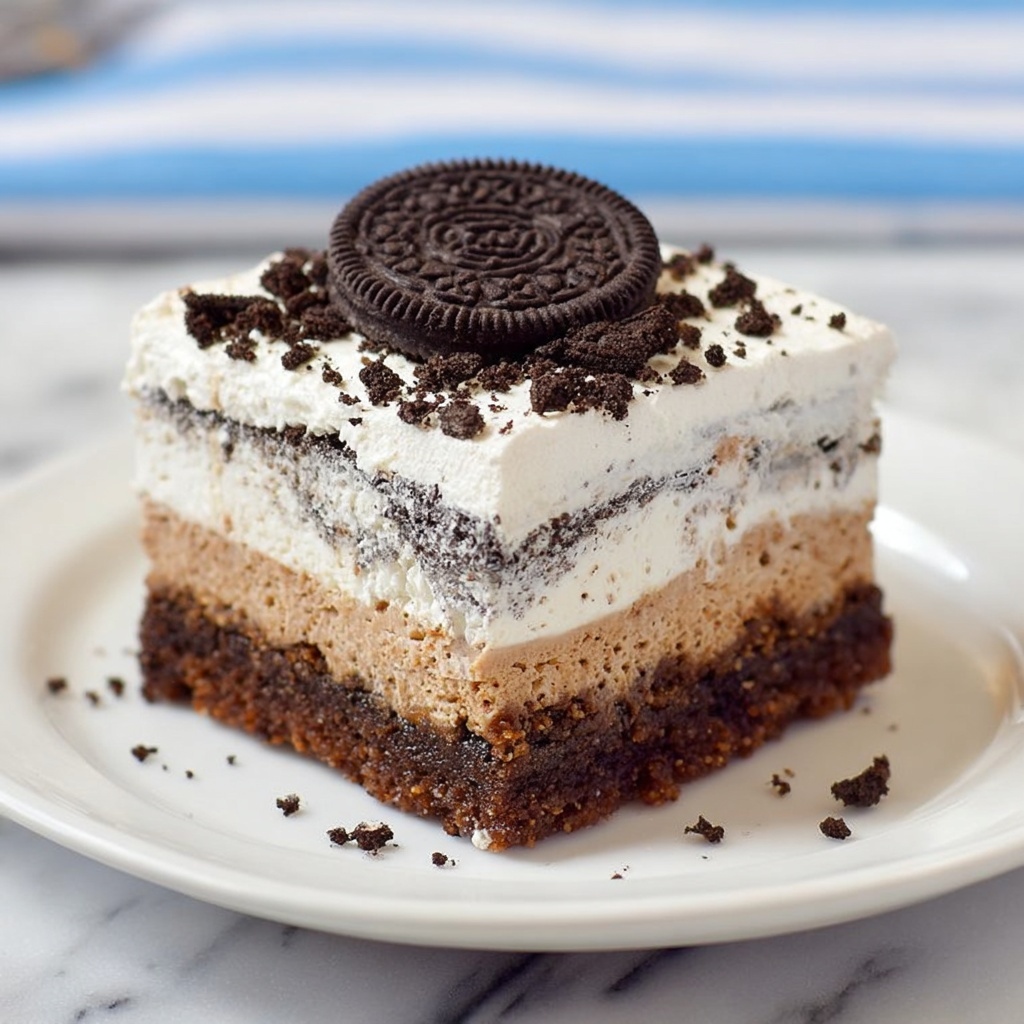
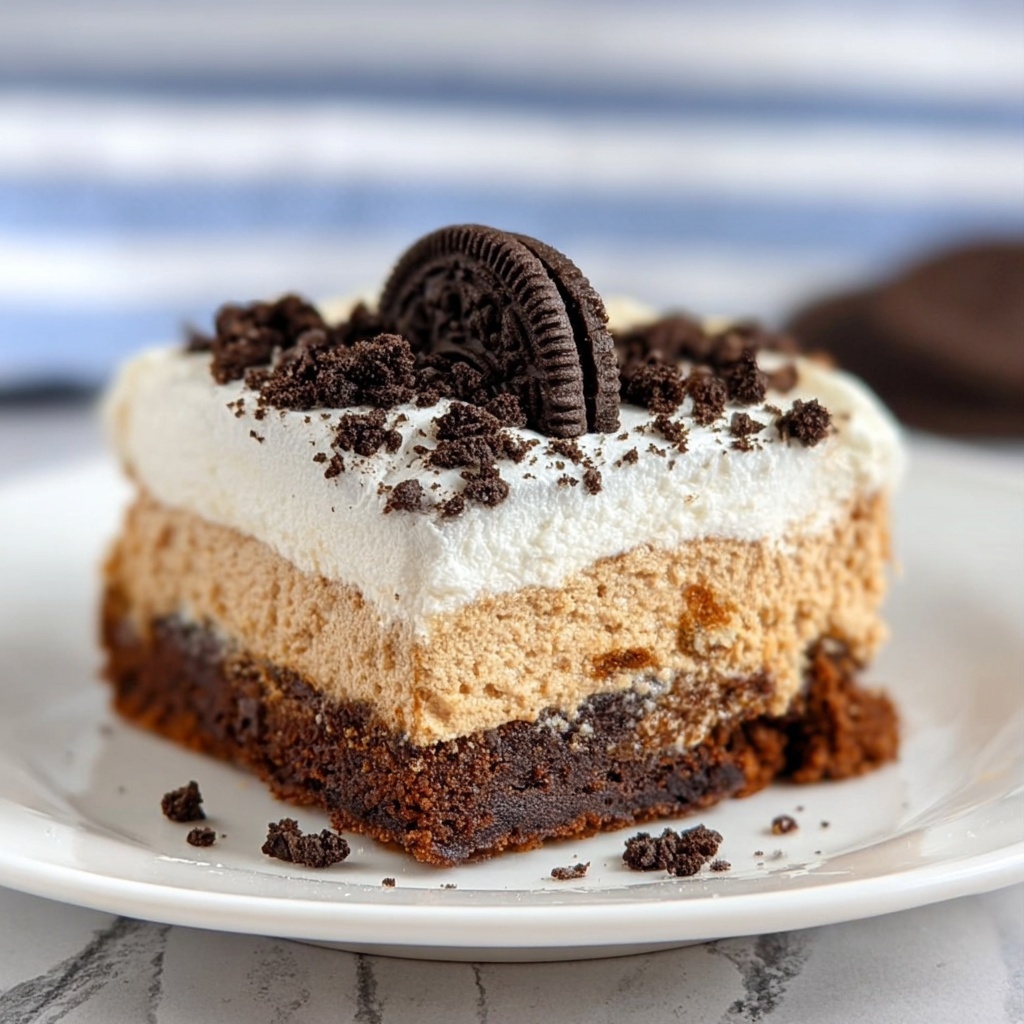
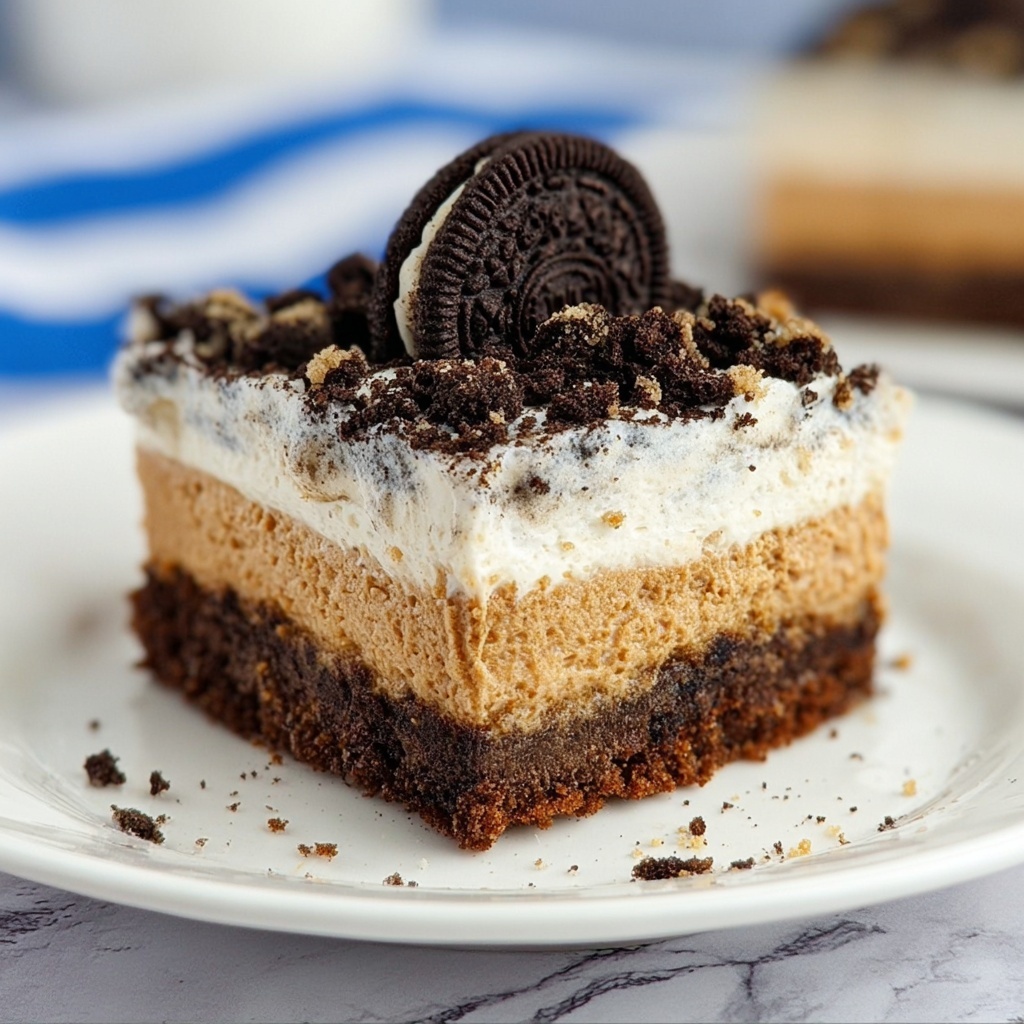
If you have a serious sweet tooth and a love for all things Oreo, you are going to adore this Chocolate Oreo Cheesecake Bars Recipe. These bars bring together a rich, creamy cheesecake infused with luscious melted milk chocolate, all resting on a crunchy Oreo cookie crust. Topped with a dreamy Oreo-studded Cool Whip layer and crowned with whole Oreo cookies, these cheesecake bars are the ultimate indulgence that’s as stunning as they are delicious. Whether you’re baking for a family gathering or simply treating yourself, this recipe promises the perfect balance of fudgy, creamy, and crunchy in every bite.
Ingredients You’ll Need
These ingredients may be simple, but each one plays a key role in crafting the perfect Chocolate Oreo Cheesecake Bars Recipe. From the crushed Oreos providing that iconic chocolate crunch to the smooth cream cheese that gives the bars their silky texture, every element is essential for that irresistible flavor and consistency.
- Oreo cookies (Large, family size package): The star ingredient for both the crust and the topping, these cookies bring rich chocolate flavor and delightful crunch.
- Butter (6 Tablespoons, melted): Helps bind the crushed Oreos into a firm, buttery crust that holds together beautifully.
- Cream cheese (3 packages, 8 ounces each, softened): Provides the creamy, tangy base for the cheesecake filling.
- Sugar (1 cup): Sweetens the cheesecake filling just enough to balance the tang of cream cheese.
- Vanilla extract (1 1/2 teaspoons): Adds a warm, aromatic note that enhances all the other flavors.
- Greek yogurt (1/3 cup): Adds moisture and a subtle tang for extra richness and softness.
- Eggs (3): Bind the cheesecake filling, giving it structure while keeping it velvety smooth.
- Ghirardelli Milk chocolate chips (1 cup, melted): Infuses the cheesecake with decadent chocolate goodness.
- Cool Whip (12 ounces, thawed): Creates a light, fluffy topping that pairs perfectly with the dense cheesecake below.
- Oreo cookies (12 crushed, plus 6 finely crushed for sprinkling, plus 15 whole): For mixing with Cool Whip, sprinkling on top, and decorating each bar with a festive finishing touch.
How to Make Chocolate Oreo Cheesecake Bars Recipe
Step 1: Prepare the Oreo Crust
Start by pulsing about 30 Oreo cookies in a food processor until they become fine crumbs. Then melt the butter and mix it into the crumbs. This combination creates a rich and sturdy base that will hold the cheesecake filling perfectly. Line a 9 x 13-inch baking dish with parchment paper and press the crust mixture evenly into the bottom. Bake it at 350 degrees Fahrenheit for 10 minutes, then let it cool on a wire rack. This early bake step sets the crust so it doesn’t crumble when you cut into the bars later.
Step 2: Make the Chocolate Cheesecake Filling
Using a stand mixer, beat the softened cream cheese until it’s completely smooth and creamy. Add the sugar, then blend in the Greek yogurt and vanilla extract. Incorporate eggs one at a time to maintain a velvety texture. Next, melt the milk chocolate chips in short intervals in the microwave until silky smooth. Slowly mix this melted chocolate into your cream cheese mixture on low speed, making sure it’s well incorporated without creating lumps. Pour this luscious filling right over your cooled Oreo crust. To keep the cheesecake moist and creamy as it bakes, place a small oven-safe dish with water on a rack beneath the pan. Bake at 350 degrees for 45 minutes, then remove and cool on a wire rack.
Step 3: Prepare the Oreo Cool Whip Topping
While the cheesecake cools, get your Cool Whip ready. Crush 12 Oreo cookies coarsely in a sealed plastic bag, then gently fold the crushed cookies into the Cool Whip. This adds texture and bursts of chocolate cookie crunch to the light, sweet topping. Once mixed, chill the Cool Whip in the fridge while the cheesecake finishes cooling completely.
Step 4: Assemble the Layers
When the cheesecake is cool, spread the Oreo Cool Whip mixture evenly over the top to create a fluffy, creamy layer that complements the dense chocolate cheesecake below. Finely crush 6 more Oreos and sprinkle them generously over the Cool Whip, giving the bars a beautiful speckled look that hints at the flavors inside. Return the entire dish to the refrigerator for several hours or, ideally, overnight to let all the layers set and flavors meld.
Step 5: Serve and Enjoy
Before serving, slice your cheesecake into generous 2 by 3-inch bars. Top each bar with a whole Oreo cookie for a stunning presentation that showcases the cookie-flavored goodness waiting beneath. Serve chilled and prepare for all the compliments coming your way!
How to Serve Chocolate Oreo Cheesecake Bars Recipe
Garnishes
Adding a few extra touches when serving can make your bars even more special. Try sprinkling a dusting of cocoa powder or a drizzle of chocolate syrup for visual appeal and an extra hit of chocolatey goodness. Fresh raspberries or strawberries also provide a lovely tart contrast that pairs surprisingly well with the creamy and sweet bars.
Side Dishes
Chocolate Oreo Cheesecake Bars Recipe shines as a dessert on their own, but pairing them with a scoop of vanilla or cookies-and-cream ice cream elevates the indulgence factor. For a lighter balance, a simple fresh fruit salad or even a cup of espresso beautifully complements the richness without overwhelming your palate.
Creative Ways to Present
For parties or special occasions, serve these bars on decorative dessert trays with mini Oreo cookie flags or edible gold leaf accents for a festive look. You can also cut the bars into smaller bite-sized squares for easy sampling at potlucks or afternoon teas. Wrapping each bar in a small square of cellophane tied with a ribbon makes a delightful homemade gift everyone will rave about.
Make Ahead and Storage
Storing Leftovers
Because these bars are rich and creamy, it’s best to store leftovers covered tightly in the refrigerator. They will stay fresh and delicious for up to 4 days, making them perfect for enjoying throughout the week or bringing to share with friends and family.
Freezing
If you want to prepare this Chocolate Oreo Cheesecake Bars Recipe ahead of time or save extra portions, freezing works well. Wrap individual bars tightly in plastic wrap and place in a freezer-safe container or bag. They can be frozen for up to 2 months. When ready to eat, thaw overnight in the refrigerator for the best texture.
Reheating
Since these bars are best enjoyed chilled, reheating is generally not recommended. If you prefer a slightly warmer dessert, letting them sit at room temperature for 15 to 20 minutes before serving allows the flavors to open up and the texture to soften just enough without losing that creamy cheesecake quality.
FAQs
Can I use a different type of cookie instead of Oreos?
While Oreos are classic for this recipe, you can experiment with other chocolate sandwich cookies or even chocolate wafer cookies. Just keep in mind that the flavor and texture might change, but it can add a fun twist.
Is it necessary to add the Greek yogurt?
Greek yogurt adds moisture and a mild tang that balances the sweetness, but if you don’t have it on hand, sour cream is a great substitute without changing the recipe too much.
Can I make these bars gluten-free?
You can try using gluten-free chocolate sandwich cookies for the crust and topping. Be sure to check all ingredient labels since some chocolate chips and Cool Whip brands may contain gluten.
Why do I place a dish of water in the oven while baking?
Placing a water-filled dish underneath the cheesecake adds steam to the oven, which helps prevent the cheesecake from cracking and keeps it moist and creamy.
How long should I chill the cheesecake before serving?
Chilling the bars for at least 4 hours is important, but overnight is ideal for the layers to fully set and flavors to meld beautifully.
Final Thoughts
This Chocolate Oreo Cheesecake Bars Recipe is truly a crowd-pleaser that combines the best of rich chocolate, creamy cheesecake, and everyone’s favorite cookie into one heavenly dessert. Once you try it, it will quickly become a favorite to make for celebrations or whenever you need a decadent treat. Dive in and enjoy every luscious bite—you deserve it!
Print
Chocolate Oreo Cheesecake Bars Recipe
- Prep Time: 30 minutes
- Cook Time: 90 minutes
- Total Time: 2 hours
- Yield: 15 bars
- Category: Dessert
- Method: Baking
- Cuisine: American
Description
Decadent Chocolate Oreo Cheesecake Bars with a rich Oreo crust, creamy chocolate-infused cheesecake filling, and a fluffy Oreo-studded Cool Whip topping. Perfectly balanced textures and chocolate flavors make these bars an irresistible dessert for any occasion.
Ingredients
Oreo Crust
- 1 package Oreo cookies (large, family size, approx. 30 cookies)
- 6 tablespoons butter (melted)
Cheesecake Filling
- 3 packages cream cheese (8 ounces each, softened)
- 1 cup sugar
- 1 1/2 teaspoons vanilla extract
- 1/3 cup Greek yogurt
- 3 eggs
- 1 cup Ghirardelli milk chocolate chips (melted)
Topping
- 12 ounces Cool Whip (thawed)
- 12 Oreo cookies (crushed into small chunks)
- 6 Oreo cookies (finely crushed for sprinkling)
- 15 Oreo cookies (whole, one for each bar piece)
Instructions
- Prepare Oreo Crust: Place approximately 30 Oreo cookies in a food processor or blender. Pulse until they become fine crumbs. Melt the butter in the microwave and pour it into the processor with the crumbs. Pulse again to combine thoroughly. Line a 9 x 13-inch baking dish with parchment paper. Press the Oreo crumb mixture evenly into the bottom of the dish. Bake at 350°F (175°C) for 10 minutes. Remove from oven and allow to cool on a wire rack.
- Make Cheesecake Filling: In a stand mixer bowl, beat the softened cream cheese until smooth. Add sugar and continue mixing until creamy. Add Greek yogurt and vanilla extract; blend until combined. Add eggs one at a time, mixing well after each addition. Melt the chocolate chips in a microwave-safe bowl in 15-second intervals until fully melted. With the mixer on low speed, gradually pour melted chocolate into the cream cheese mixture and blend until fully incorporated. Scrape down the sides of the bowl and mix again. Pour the cheesecake filling over the cooled Oreo crust in the baking dish. Place a small oven-safe dish filled halfway with water on the oven rack directly below the cheesecake to maintain moisture. Bake at 350°F (175°C) for 45 minutes. Remove from oven and cool on a wire rack.
- Prepare Oreo Cool Whip Topping: While the cheesecake cools, take the Cool Whip out of the refrigerator and let it come to room temperature. Place 12 Oreo cookies in a Ziploc bag and crush them with a heavy glass into small chunks. Mix the crushed Oreos into the Cool Whip until evenly blended. Refrigerate the mixture until the cheesecake is completely cool.
- Assemble the Topping: Once the cheesecake has cooled, spread the Oreo Cool Whip mixture evenly over the top. Finely crush 6 Oreo cookies in a Ziploc bag and sprinkle these crumbs over the Cool Whip layer for decoration. Refrigerate the cheesecake bars until ready to serve, preferably overnight for the best texture and flavor.
- Serve: Cut the cheesecake into 2 inch by 3 inch bars. Place one whole Oreo cookie on top of each piece just before serving. Enjoy your rich and creamy Chocolate Oreo Cheesecake Bars!
Notes
- Be sure to soften the cream cheese to ensure a smooth batter without lumps.
- Using a water bath during baking helps keep the cheesecake moist and prevents cracking.
- Allow the Cool Whip to soften slightly at room temperature for easier mixing with crushed Oreos.
- Refrigerate the assembled cheesecake bars for several hours or overnight to allow flavors to meld and the texture to set.
- Using parchment paper makes removal from the baking dish easier and cleaner.

