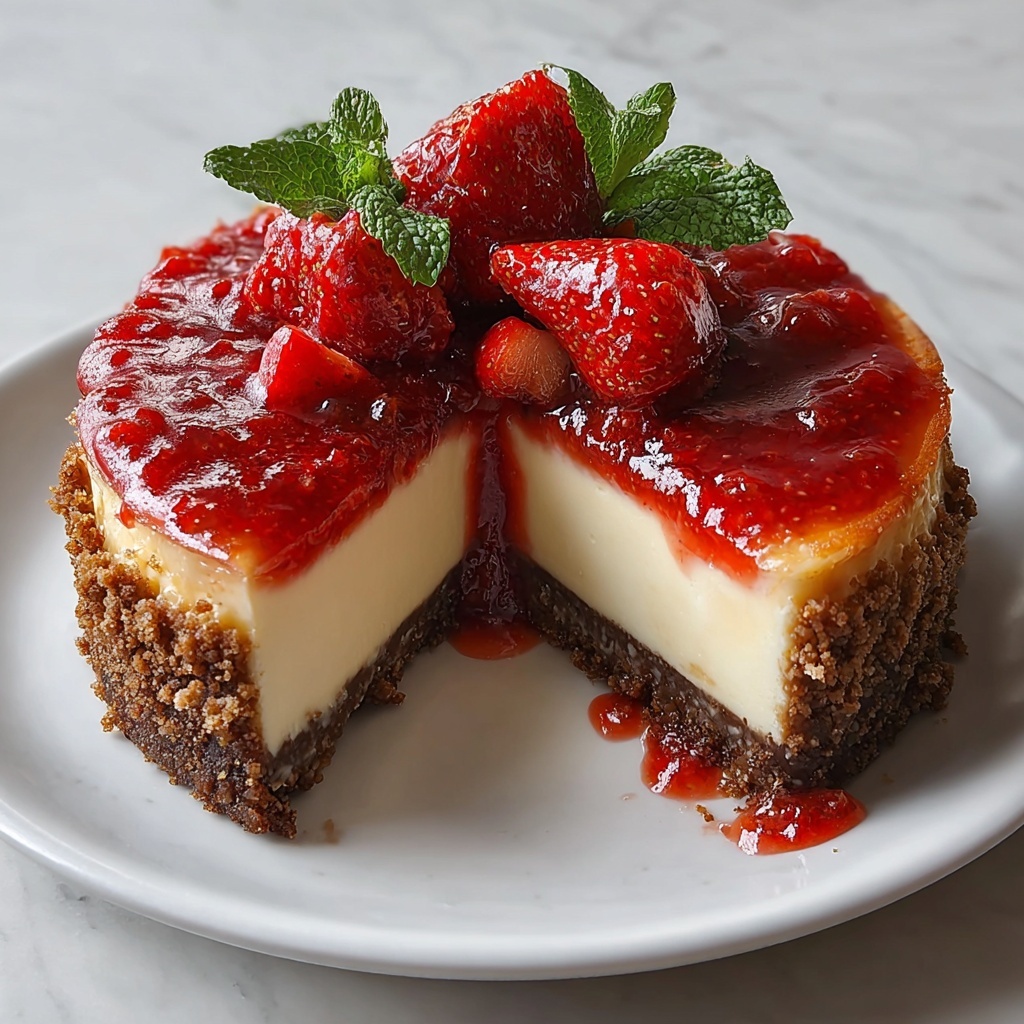
Oh, if you love the magical combination of creamy, tangy cheesecake with luscious strawberries and a delightfully crunchy topping, this Strawberry Crumble Cheesecake Recipe will absolutely become your new favorite indulgence. The way the sweet strawberry layer swirls through the smooth cheesecake filling, crowned with a buttery, cinnamon-kissed crumble, is nothing short of heavenly. Whether you’re serving it for a special occasion or treating yourself on a quiet evening, this dessert strikes the perfect balance of fresh fruitiness and rich decadence in every bite.

Ingredients You’ll Need
Everything about this Strawberry Crumble Cheesecake Recipe starts with simple, straightforward ingredients that each play a crucial role in building those incredible flavors and textures. From buttery graham cracker crumbs to ripe strawberries and creamy cheese, every element is essential and worth savoring.
- Graham cracker crumbs: This creates the sturdy, slightly sweet base for the crust, giving your cheesecake a satisfying crunch.
- Unsalted butter: Melted for the crust and cold for the crumble, it brings richness and helps bind all the components together beautifully.
- Cream cheese: The star of the cheesecake filling, it must be full-fat and at room temperature for that silky, luscious texture.
- Granulated sugar: Sweetens the crust, filling, and strawberry layer, perfectly balancing the tangy cream cheese.
- Sour cream and heavy cream: Both add creaminess and slight acidity, making the cheesecake extra smooth and tender.
- Fresh strawberries: Hulled, chopped, and cooked down to create a bright, fruity layer that bursts with summer flavor.
- Rolled oats: Optional but highly recommended in the crumble topping for added texture and a beautiful rustic crunch.
- Lemon juice and zest: Just a touch brightens the whole cheesecake, giving it a fresh, zingy lift.
- Vanilla extract and ground cinnamon: Warm spices that subtly elevate the crumble and filling with cozy notes.
- Eggs and cornstarch (or flour): These help set the cheesecake filling perfectly without cracking, ensuring smoothness from first bite to last.
How to Make Strawberry Crumble Cheesecake Recipe
Step 1: Prepare the Pan
Start by greasing a 9-inch springform pan and lining the bottom with parchment paper. Wrapping the outside with heavy-duty foil prevents water from seeping in during the water bath, which is key for that wonderfully smooth and crack-free cheesecake texture.
Step 2: Make the Crust
Mix graham cracker crumbs, sugar, and salt, then stir in melted butter until the crumbs resemble wet sand. Press this mixture firmly into the pan’s base to form an even crust. Chilling it in the fridge helps it set up nicely, or you can bake it briefly for a toasty flavor.
Step 3: Prepare the Strawberry Layer
Cook chopped strawberries with sugar and lemon juice until they release their juice and soften. Add a cornstarch slurry to thicken the mixture into a glossy sauce, then cool completely. This luscious strawberry layer will add bright pockets of freshness throughout the cheesecake.
Step 4: Make the Crumble Topping
Toss together flour, oats, sugars, salt, and cinnamon, then cut in cold butter until coarse crumbs form. Adding vanilla extract last brings a fragrant sweetness. Keep this chilling in the fridge so when it bakes, it creates that irresistible crunch on top.
Step 5: Prepare the Cheesecake Filling
Beat room-temperature cream cheese until smooth, then gradually add sugar, sour cream, heavy cream, vanilla, lemon juice, zest, cornstarch, and salt. Lastly, incorporate eggs one at a time on low speed to keep the batter silky without over-aerating. This filling is pure velvet in texture and flavor.
Step 6: Assemble the Cheesecake
Pour the filling over your prepared crust, smooth the surface, and gently dollop the cooled strawberry mixture on top. Swirl lightly with a knife to keep distinct areas of fruit and cheesecake that will shine through after baking.
Step 7: Add the Crumble Topping and Bake
Sprinkle the chilled crumble evenly over the top, leaving little gaps for the strawberry layer to peek through. Set your springform pan in a water bath to bake at 325°F for about 60 to 75 minutes. The cheesecake edges should look set while the center still has a little wiggle — perfect for creamy perfection.
Step 8: Cool and Chill
Cool the cheesecake gradually in the oven with the door ajar to prevent cracking, then move to a wire rack before chilling in the fridge for at least 6 hours, ideally overnight. Patience here pays off with a beautifully firm yet supple texture.
How to Serve Strawberry Crumble Cheesecake Recipe

Garnishes
Before serving, fresh strawberry halves and sprigs of mint add a bright, inviting finish. A dollop or swirl of whipped cream adds dreamy richness, complementing the crumble’s crunch and the cheesecake’s creaminess perfectly.
Side Dishes
This strawberry crumble cheesecake pairs beautifully with a light fruit salad, a scoop of vanilla bean ice cream, or even a zesty lemon sorbet. These accompaniments enhance the fruit flavors and add refreshing contrast without overpowering the main event.
Creative Ways to Present
Try serving slices on pretty dessert plates with a drizzle of strawberry sauce or a dusting of powdered sugar. For a fun twist, portion into individual jars layered with extra crumble and whipped cream, making it both elegant and easy to enjoy with friends.
Make Ahead and Storage
Storing Leftovers
Cover your leftover cheesecake tightly with plastic wrap and store it in the refrigerator for up to 4 days. This keeps the cheesecake moist and protects it from absorbing other odors, so the strawberry crumble stays fresh and flavorful.
Freezing
You can freeze the cheesecake for up to 1 month by wrapping it well in multiple layers of plastic wrap and foil. Thaw it slowly overnight in the fridge before serving to maintain that creamy texture and vibrant strawberry taste.
Reheating
Cheesecake is best enjoyed chilled, but if you prefer it slightly warmer, let it sit at room temperature for about 30 minutes before serving. Avoid reheating in the microwave as it may cause the texture to separate and the crumble to lose its crispness.
FAQs
Can I use frozen strawberries for the strawberry layer?
Fresh strawberries provide the best flavor and texture for the strawberry layer, but you can use frozen if that’s what you have. Just thaw and drain any excess liquid before cooking to avoid making the layer too watery.
What if my crumble topping is too soft after baking?
If the crumble topping isn’t as crisp as you’d like, try baking it uncovered for a few minutes longer next time. Also, ensuring the butter is properly chilled before mixing helps it create a flakier, crunchier texture.
How do I prevent cracks in the cheesecake?
Using a water bath to bake the cheesecake and slowly cooling it with the oven door ajar significantly reduces cracking. Additionally, avoid overbeating the eggs and mix the batter gently to keep air bubbles minimal.
Can I make this cheesecake gluten-free?
Absolutely! Use gluten-free graham cracker crumbs or digestive biscuit crumbs for the crust, and substitute the all-purpose flour in the crumble topping and filling with gluten-free flour blends. The recipe adapts wonderfully to gluten-free diets.
Is it necessary to use a water bath when baking?
While not absolutely mandatory, the water bath helps maintain even baking temperature and moisture, resulting in a silky smooth cheesecake without cracks. If you prefer, you can bake without it but expect a slightly firmer texture and higher risk of cracking.
Final Thoughts
I cannot recommend this Strawberry Crumble Cheesecake Recipe enough! It’s one of those recipes that feels like a special celebration every time you take a bite. With its deliciously creamy filling, fresh strawberry swirls, and irresistible crumble topping, it’s perfect to impress friends and delight family. Give it a try and watch your cheesecake game reach a whole new level of delicious!
Print
Strawberry Crumble Cheesecake Recipe
- Prep Time: 1 hour
- Cook Time: 1 hour 10 minutes
- Total Time: 2 hours 10 minutes plus chilling time
- Yield: 10-12 servings
- Category: Dessert
- Method: Baking
- Cuisine: American
Description
This Strawberry Crumble Cheesecake features a creamy, rich cheesecake layered with a luscious strawberry compote and topped with a buttery oat crumble. Housed in a crisp graham cracker crust, it is baked in a water bath for a smooth, crack-free texture. Perfectly balanced with fresh strawberry swirls and a crunchy topping, this dessert is a delightful combination of creamy, fruity, and crunchy elements ideal for any occasion.
Ingredients
For the crust:
- 1 1/2 cups (150 g) graham cracker crumbs or digestive biscuit crumbs
- 2 tbsp granulated sugar
- 1/4 tsp fine sea salt
- 6 tbsp (85 g) unsalted butter, melted
For the cheesecake filling:
- 24 oz (680 g) cream cheese, full-fat, at room temperature
- 3/4 cup (150 g) granulated sugar
- 1/3 cup (80 ml) sour cream, at room temperature
- 1/3 cup (80 ml) heavy cream, at room temperature
- 3 large eggs, at room temperature
- 2 tsp pure vanilla extract
- 1 tbsp fresh lemon juice
- 1 tsp finely grated lemon zest (optional)
- 1 tbsp cornstarch or all-purpose flour
- Pinch of fine sea salt
For the strawberry layer:
- 2 1/2 cups (350 g) fresh strawberries, hulled and chopped
- 1/4 cup (50 g) granulated sugar
- 1 tbsp lemon juice
- 2 tsp cornstarch
- 2 tbsp water
For the crumble topping:
- 3/4 cup (95 g) all-purpose flour
- 1/2 cup (50 g) rolled oats (optional but recommended for texture)
- 1/3 cup (70 g) light brown sugar, packed
- 1/4 cup (50 g) granulated sugar
- 1/4 tsp fine sea salt
- 1/2 tsp ground cinnamon (optional)
- 6 tbsp (85 g) unsalted butter, cold and cut into small cubes
- 1/2 tsp vanilla extract
For garnish (optional but beautiful):
- 1 cup (150 g) fresh strawberries, halved or sliced
- Whipped cream for serving
- Fresh mint leaves
Instructions
- Prepare the pan: Use a 9-inch (23 cm) springform pan. Lightly grease the sides and bottom with butter or non-stick spray. Line the bottom with parchment paper for easy removal. Wrap the outside of the pan tightly with 2–3 layers of heavy-duty aluminum foil to prevent water leakage if using a water bath.
- Make the crust: In a mixing bowl, combine graham cracker crumbs, sugar, and salt. Pour in the melted butter and mix with a fork until all crumbs are evenly moistened and resemble wet sand. Transfer the mixture to the prepared springform pan. Press the crumbs firmly into the bottom of the pan using the bottom of a glass or measuring cup to create an even, compact layer. Chill the crust in the refrigerator for at least 15 minutes while you prepare the filling, or bake at 350°F (175°C) for 8 minutes for a slightly firmer, toasted crust. If baked, allow it to cool while you proceed.
- Prepare the strawberry layer: In a small saucepan, combine chopped strawberries, sugar, and lemon juice. Cook over medium heat, stirring occasionally, until the strawberries release their juices and begin to soften, about 5–7 minutes. In a small bowl, whisk cornstarch and water until smooth. Stir the cornstarch slurry into the strawberry mixture. Continue cooking for 1–3 minutes until the sauce thickens and becomes glossy. Remove from heat and let it cool to room temperature. It will thicken further as it cools.
- Make the crumble topping: In a medium bowl, combine flour, rolled oats, brown sugar, granulated sugar, salt, and cinnamon if using. Add the cold cubed butter. Using your fingertips, a pastry cutter, or two forks, cut the butter into the dry ingredients until the mixture looks like coarse crumbs with some pea-sized pieces of butter remaining. Drizzle in the vanilla extract and toss lightly to combine. Place the crumble in the refrigerator while you prepare the cheesecake filling so the butter stays cold.
- Prepare the cheesecake filling: Preheat the oven to 325°F (160°C). In a large mixing bowl, beat the room-temperature cream cheese with an electric mixer on medium speed until completely smooth and creamy, about 2–3 minutes. Scrape down the sides and bottom of the bowl. Add the sugar and beat again until light and smooth, 1–2 minutes more. Add the sour cream, heavy cream, vanilla, lemon juice, lemon zest (if using), cornstarch, and salt. Beat on low to medium-low speed until combined and silky, scraping the bowl as needed. Add the eggs one at a time, beating on low speed after each addition just until incorporated. Do not overbeat once the eggs are added, as this can add too much air and cause cracking. Tap the bowl lightly on the counter a few times to release any large air bubbles.
- Assemble the cheesecake: Pour the cheesecake filling over the prepared crust in the springform pan. Gently smooth the top with an offset spatula or the back of a spoon. Spoon the cooled strawberry mixture over the top in small dollops, then gently swirl some of it into the cheesecake with a knife or skewer, leaving some thicker patches for bold strawberry pockets. Do not over-swirl; you want distinct areas of cheesecake and strawberry.
- Add the crumble: Take the chilled crumble mixture out of the refrigerator. Sprinkle it evenly over the top of the strawberry-swirled cheesecake batter, covering most of the surface but leaving small gaps where the strawberry and cheesecake peek through. Lightly press the crumble down so it adheres to the batter but do not pack it firmly.
- Prepare a water bath (recommended for smooth texture): Place the foil-wrapped springform pan in a large roasting pan. Pour hot water into the roasting pan until it comes halfway up the sides of the springform pan, being careful not to splash water into the cheesecake. Alternatively, place a separate pan of hot water on a lower oven rack to create steam without directly bathing the cheesecake.
- Bake: Bake at 325°F (160°C) for 60–75 minutes. The edges should look set and slightly puffed, and the center should still have a gentle wobble when you jiggle the pan. If the crumble is browning too quickly near the end, tent the top loosely with foil.
- Cool gradually: Turn off the oven and crack the door open slightly. Let the cheesecake sit in the oven for 45–60 minutes to cool slowly and reduce the risk of cracks. Remove the pan from the water bath and carefully remove the foil. Place the cheesecake on a wire rack and allow it to cool to room temperature, 1–2 hours.
- Chill fully: Once at room temperature, cover the cheesecake (still in the pan) and refrigerate for at least 6 hours, preferably overnight. This time allows the texture to set and the flavors to deepen.
- Garnish and serve: Run a thin knife around the edge of the cheesecake to loosen it from the sides of the pan. Release the springform ring and transfer the cheesecake to a serving plate or cake stand. Just before serving, top with fresh strawberry halves or slices. Add small swirls or dollops of whipped cream around the edges or in the center if desired. Garnish with a few mint leaves for a fresh, vibrant look. Slice with a sharp knife, wiping the blade clean between cuts for neat slices.
Notes
- Using a water bath helps prevent cracks and creates a creamy texture.
- Make sure all dairy ingredients and eggs are at room temperature to ensure a smooth batter.
- Do not overbeat the eggs into the batter to avoid incorporating excess air, which can cause cracking.
- The crumble topping can be customized by adding nuts or shredded coconut for extra texture.
- Chilling the cheesecake overnight greatly improves the flavor and texture.
- To achieve a firmer crust, bake it before adding the filling; otherwise, chilling alone is sufficient.
- Swirling the strawberry mixture gently ensures distinct pockets without losing the visual appeal.


