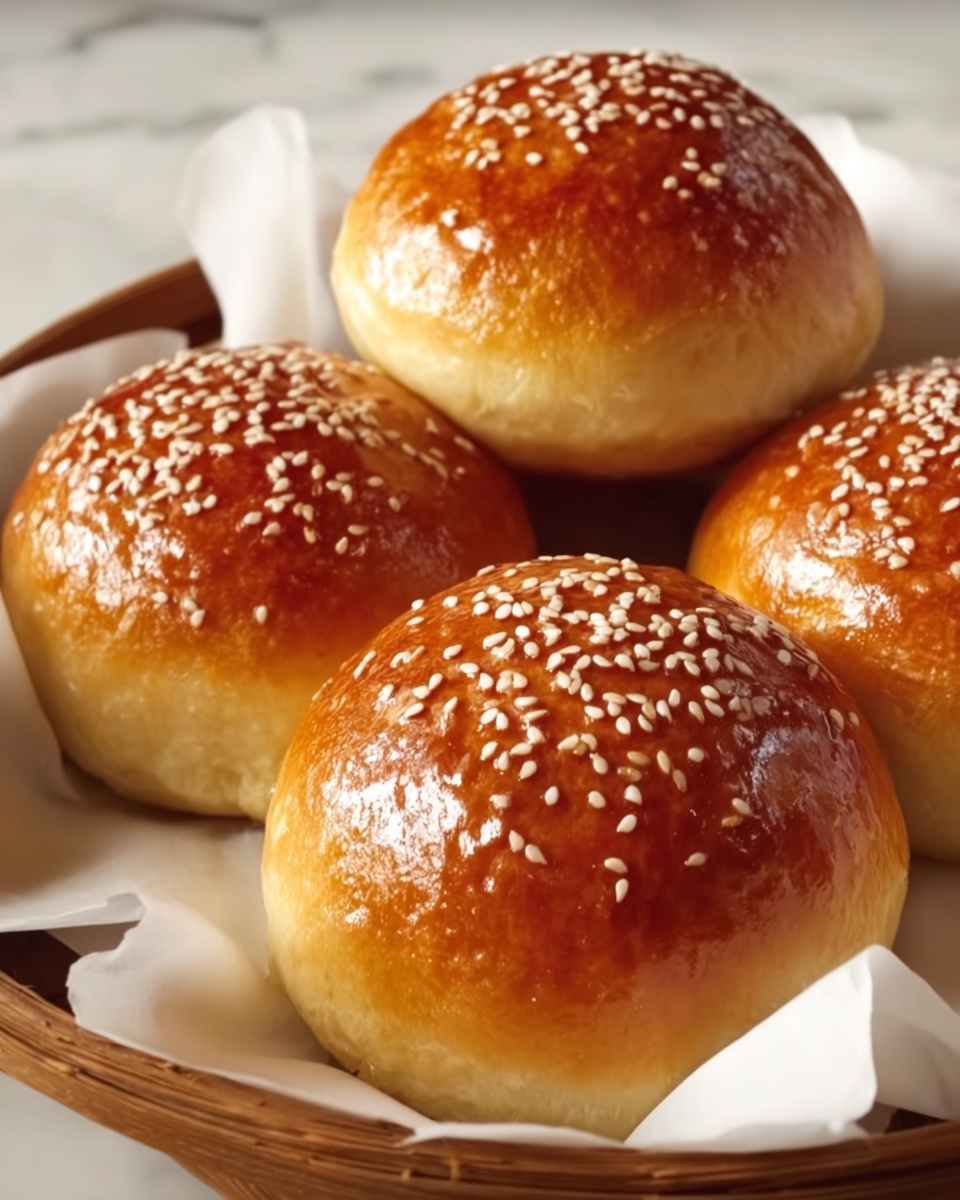
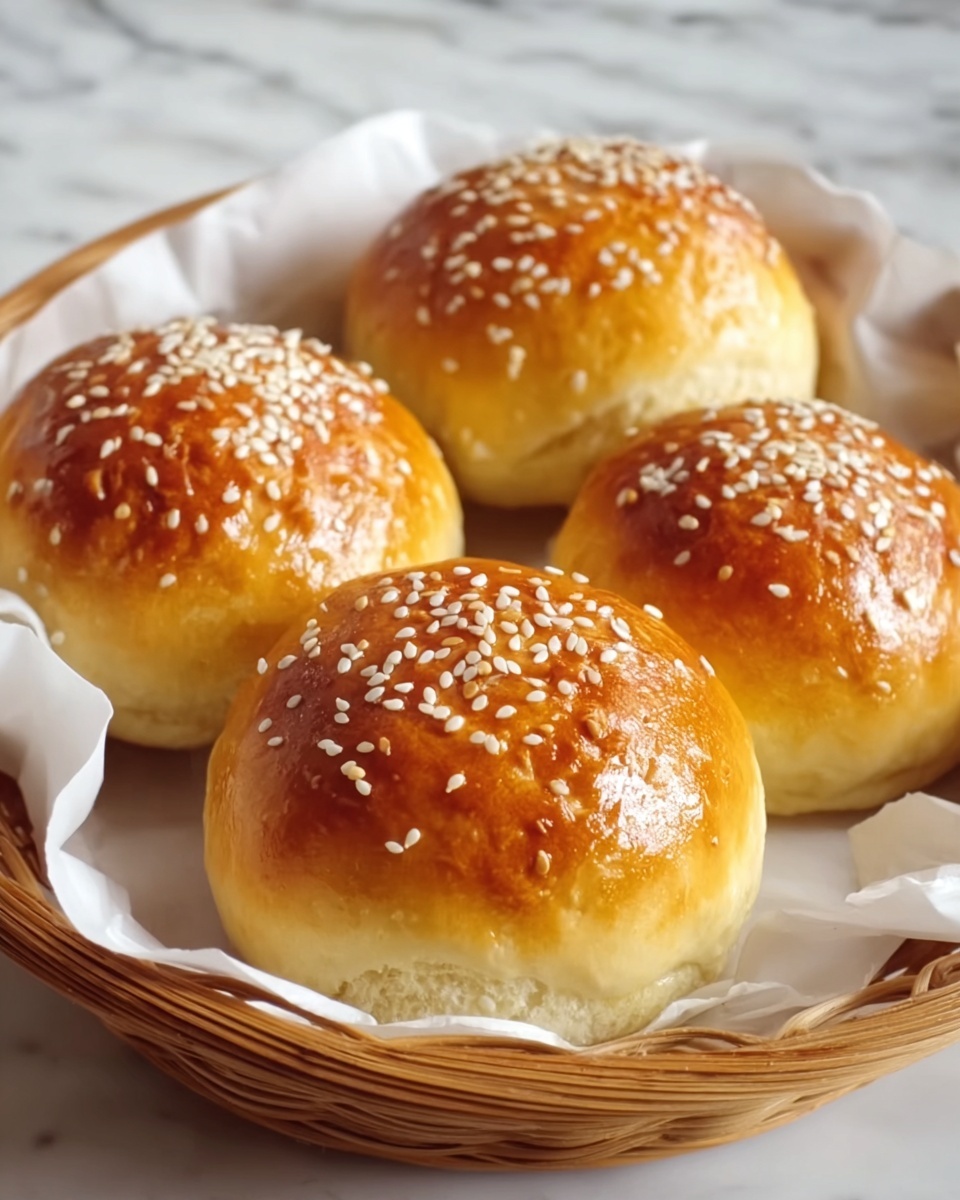
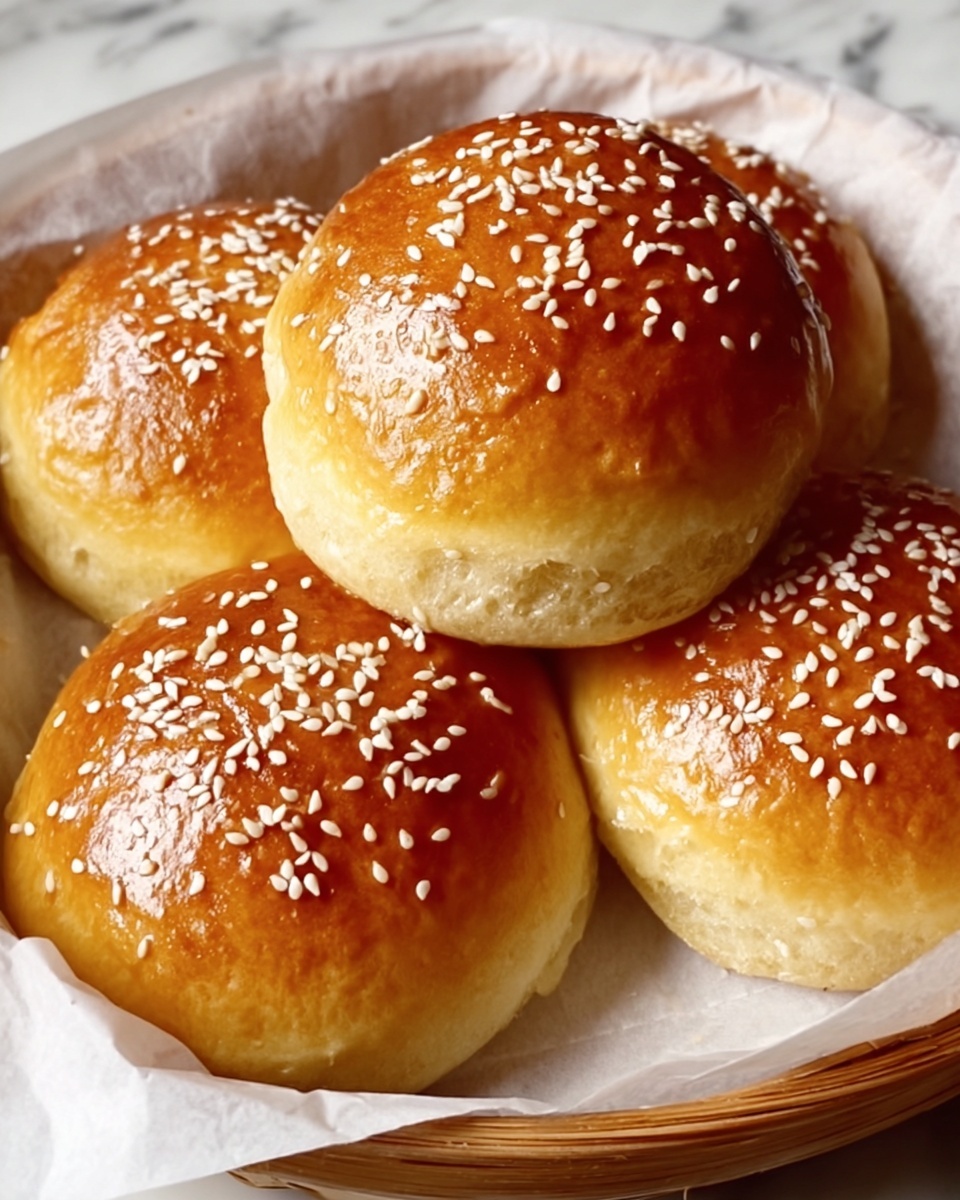
If you’re searching for a warm, comforting treat that fills your kitchen with the most welcoming aroma and delights every palate, look no further than Sesame Seed Bread Rolls: A Family Favorite Recipe. These golden rolls boast a soft, tender crumb and a delightful sesame seed crunch on top, combining simple ingredients into a classic bread roll that brings everyone to the table. They are as perfect for breakfast as they are for dinner, and once you try them, they’re sure to become a beloved staple in your home just like they are in mine.
Ingredients You’ll Need
The beauty of this recipe lies in how straightforward and wholesome the ingredients are, yet each one plays a vital role in building that perfect texture and flavor that makes these rolls so special.
- 380 g (3 cups) all-purpose flour: The backbone of the dough, providing structure and chewiness.
- 20 g (3 tablespoons) cornstarch: Adds softness and a slight delicate crumb to the rolls.
- 40 g (3 tablespoons) butter, melted: Infuses richness and moisture for an irresistible tender bite.
- 50 g (⅝ cup) sugar: Just enough sweetness to complement the nutty sesame topping.
- 1 egg: Helps bind ingredients and contributes to a golden crust when brushed on.
- 7 g (1 teaspoon) salt: Balances sweetness and enhances flavor complexity.
- 7 g (1 ½ tsp) dry yeast: The magical agent that makes the dough rise and become fluffy.
- 150 ml (⅔ cup) hot milk: Activates the yeast and adds tenderness to the crumb.
- 40 ml (3 tablespoons) vegetable oil: Keeps the dough moist and extends freshness.
- Melted butter (for brushing): Gives a shiny, flavorful finish and helps sesame seeds stick.
- Sesame seeds (for topping): Provides a toasty crunch and signature look.
How to Make Sesame Seed Bread Rolls: A Family Favorite Recipe
Step 1: Mix and Knead Your Dough
Begin by whisking together the flour, cornstarch, salt, and dry yeast in a large bowl—this dry mix is the foundation. Then add in the melted butter, hot milk, vegetable oil, egg, and sugar. Knead everything thoroughly until the dough is smooth and elastic, which usually takes about 8-10 minutes. This step is where the magic happens, transforming simple ingredients into a supple dough that’s ready to rise.
Step 2: First Rise — Let the Dough Rest
Cover the bowl with a clean kitchen towel or plastic wrap, then place it somewhere warm. Let the dough relax and double in size over about an hour. This resting phase lets the yeast work its magic, producing those airy pockets inside your rolls that everyone loves. Patience here is key because a good rise means fluffy, light bread.
Step 3: Shape and Seed the Rolls
Once your dough has risen beautifully, punch it down gently to release air, then cut it into equal pieces. Roll each piece into a ball, then flatten into a disc. Brush one half of each disc with melted butter — this not only adds flavor but also helps the sesame seeds stick and toast nicely during baking. Sprinkle a generous amount of sesame seeds over the buttered halves for that iconic look and crunch.
Step 4: Roll Up and Let Rise Again
Take each disc and roll it up by folding the seeded half over the plain side, slightly overlapping the layers for a lovely textured roll. Place these on a baking sheet lined with parchment paper and cover them again for a second rise of about an hour. This final proof is what gives the rolls their delightful fluffiness and that tender crumb we all crave.
Step 5: Bake to Perfection
Preheat your oven to 180°C (350°F). Before sliding your rolls in, brush each one gently with egg yolk; this step guarantees that beautiful golden-brown finish that makes them look as incredible as they taste. Bake for 25 minutes, watching as they puff up and develop a gorgeous crust. When they’re done, the smell will tempt you to dig in immediately, but a moment’s cooling helps set their shape just right.
Step 6: Enjoy Warm and Fresh
The best way to savor Sesame Seed Bread Rolls: A Family Favorite Recipe is warm from the oven, simply as they are or with a dab of butter. Their soft interiors and crunch from the sesame seeds create an unbeatable combination that feels like a big, comforting hug on a plate.
How to Serve Sesame Seed Bread Rolls: A Family Favorite Recipe
Garnishes
While these rolls shine on their own, a light brush of melted butter right after baking keeps them tender and shiny. For a little extra flair, add a sprinkle of flaky sea salt or herbs like rosemary right before serving, enhancing their flavor without overpowering the sesame’s nutty notes.
Side Dishes
Sesame Seed Bread Rolls are incredibly versatile at the table. They pair beautifully with hearty stews, soups, or vibrant salads. Try them alongside creamy tomato basil soup or a roasted chicken dinner for a well-rounded meal. Their sturdy yet tender texture makes them perfect for mopping up sauces or serving as a sandwich base.
Creative Ways to Present
To elevate your presentation, arrange the rolls in a woven basket lined with a soft cloth napkin for a rustic feel. You can also slice partially through the rolls horizontally, fill them with fresh herbs and soft cheese, or make mini sliders with your favorite fillings. These personal touches turn simple bread rolls into a centerpiece everyone will cherish.
Make Ahead and Storage
Storing Leftovers
If you find yourself with extra rolls (though that rarely happens!), store them in an airtight container at room temperature for up to two days. Keeping them sealed preserves their softness and prevents the sesame seeds from losing their crunch.
Freezing
For longer storage, these sesame seed bread rolls freeze remarkably well. Wrap each roll individually in plastic wrap and place them in a freezer-safe bag or container. When frozen, they’ll keep their freshness for up to two months. This is a fantastic option for planning ahead and having homemade bread ready whenever you need it.
Reheating
To enjoy your rolls after storing or freezing, warm them in a preheated oven at 160°C (320°F) for 10-15 minutes. This method revives their crisp crust and soft interior beautifully. Avoid microwaving as that can make them tough or chewy, and nothing beats freshly warmed bread with that toasty sesame finish.
FAQs
Can I substitute butter with oil in this recipe?
While the recipe uses melted butter for richness, vegetable oil could replace it in a pinch. Keep in mind that butter adds a distinct flavor and contributes to a tender crumb, so the texture might be slightly different but still delicious.
What if I don’t have cornstarch? Can I leave it out?
Cornstarch helps create a softer crumb texture in the rolls. If you don’t have it on hand, you can skip it, but the rolls might be a bit denser. Using all-purpose flour alone will still give you tasty results.
Why does the dough need two rises?
The first rise allows the yeast to ferment and develop flavor while creating airy pockets. The second rise, after shaping, ensures the rolls become light and fluffy with a tender texture once baked—crucial for the perfect bite.
Can I use whole wheat flour instead of all-purpose flour?
Whole wheat flour can be used, but it tends to absorb more liquid and produce denser bread. For lighter rolls, consider substituting only half of the flour with whole wheat or adjusting liquid amounts accordingly.
How long will these rolls stay fresh after baking?
When stored properly at room temperature in an airtight container, these rolls stay fresh for about two days. Their texture is best right after baking or when reheated gently as described above.
Final Thoughts
There’s something truly comforting about pulling warm, golden sesame seed bread rolls fresh from the oven. Sesame Seed Bread Rolls: A Family Favorite Recipe isn’t just bread; it’s a little celebration of simple ingredients coming together to create joy at the table. Whether you’re new to baking or an experienced bread lover, these rolls invite you to share moments with those you care about. Give this recipe a whirl—it may just become your next treasured family favorite.
Print
Sesame Seed Bread Rolls: A Family Favorite Recipe
- Prep Time: 30 minutes
- Cook Time: 25 minutes
- Total Time: 1 hour 55 minutes
- Yield: 12 bread rolls
- Category: Bread
- Method: Baking
- Cuisine: Western
Description
These Sesame Seed Bread Rolls are a beloved family favorite, featuring soft, fluffy dough enriched with butter and milk, topped generously with sesame seeds for a delightful crunch. Perfect as a snack or alongside meals, these rolls are simple to make and baked to golden perfection.
Ingredients
Dough Ingredients
- 380 g (3 cups) all-purpose flour
- 20 g (3 tablespoons) cornstarch
- 7 g (1 teaspoon) salt
- 7 g (1 ½ teaspoons) dry yeast
- 40 g (3 tablespoons) butter, melted
- 150 ml (⅔ cup) hot milk
- 40 ml (3 tablespoons) vegetable oil
- 1 egg
- 50 g (⅝ cup) sugar
Topping
- Melted butter (for brushing)
- Sesame seeds (for topping)
- Egg yolk (for brushing before baking)
Instructions
- Mix the dry ingredients and wet ingredients: In a large bowl, whisk together the flour, cornstarch, salt, and dry yeast. Add the melted butter, hot milk, vegetable oil, egg, and sugar to the flour mixture. Knead the mixture until you obtain a smooth dough.
- First proofing: Cover the dough and let it rest in a warm place for 1 hour, or until it doubles in size.
- Shape the rolls: Once risen, cut the dough into pieces and roll each piece into a ball. Flatten each ball into a disc. Brush one half of each disc with melted butter and sprinkle sesame seeds over it.
- Roll and second proofing: Roll the discs overlapping them slightly to form the rolls, then place them on a baking sheet lined with parchment paper. Cover and let them rise for another hour.
- Preheat and prepare for baking: Preheat the oven to 180°C (350°F). Brush the rolls with egg yolk to give them a golden finish when baked.
- Bake the rolls: Bake for 25 minutes, or until the rolls turn golden brown.
- Serve: Enjoy your sesame seed bread rolls warm for the best flavor and texture.
Notes
- Make sure the milk is hot but not boiling to activate the yeast properly.
- Kneading until smooth is important for a soft texture.
- The second proofing allows the rolls to develop a light, fluffy crumb.
- Brushing with egg yolk enhances the golden color and shine of the crust.
- Store any leftovers in an airtight container to keep them fresh.


