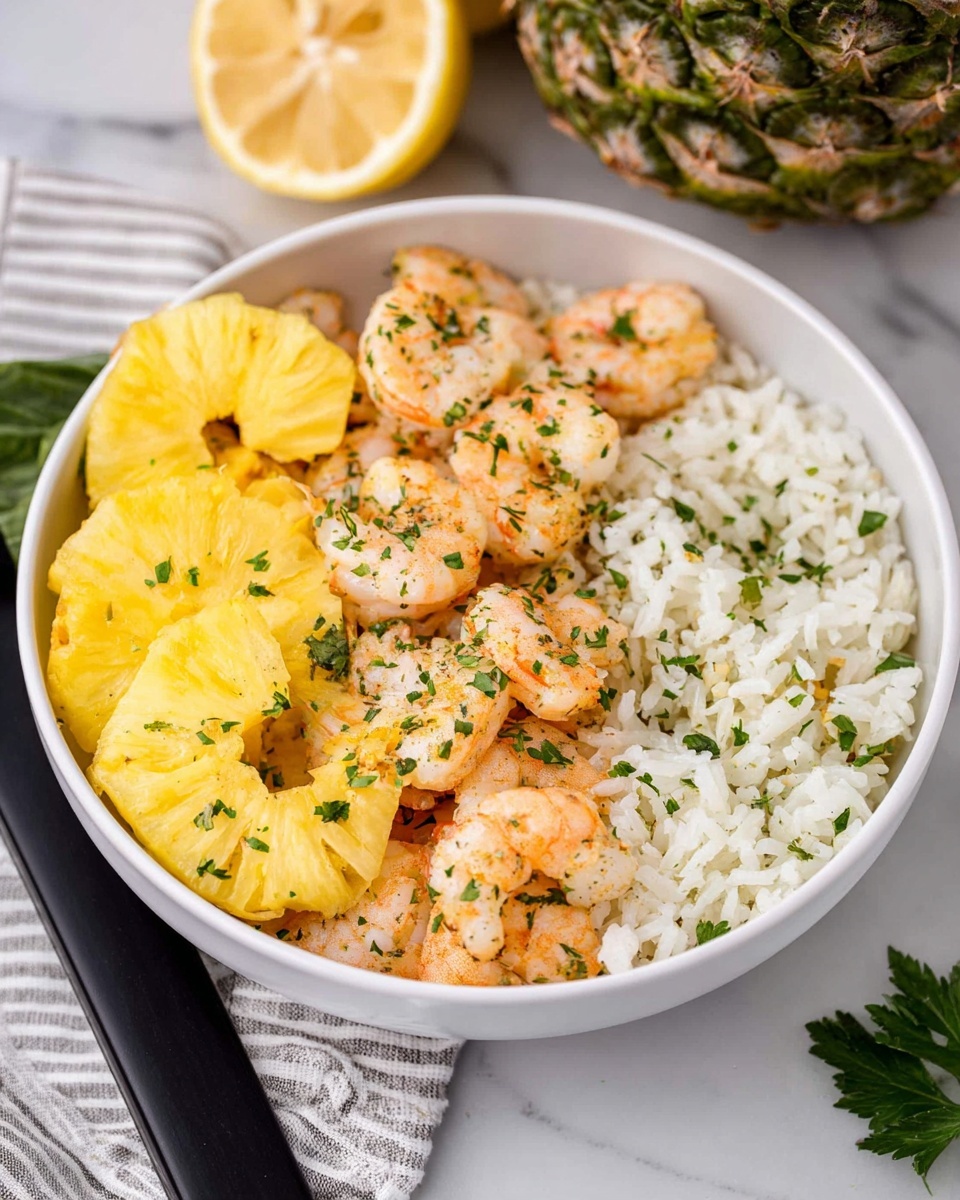
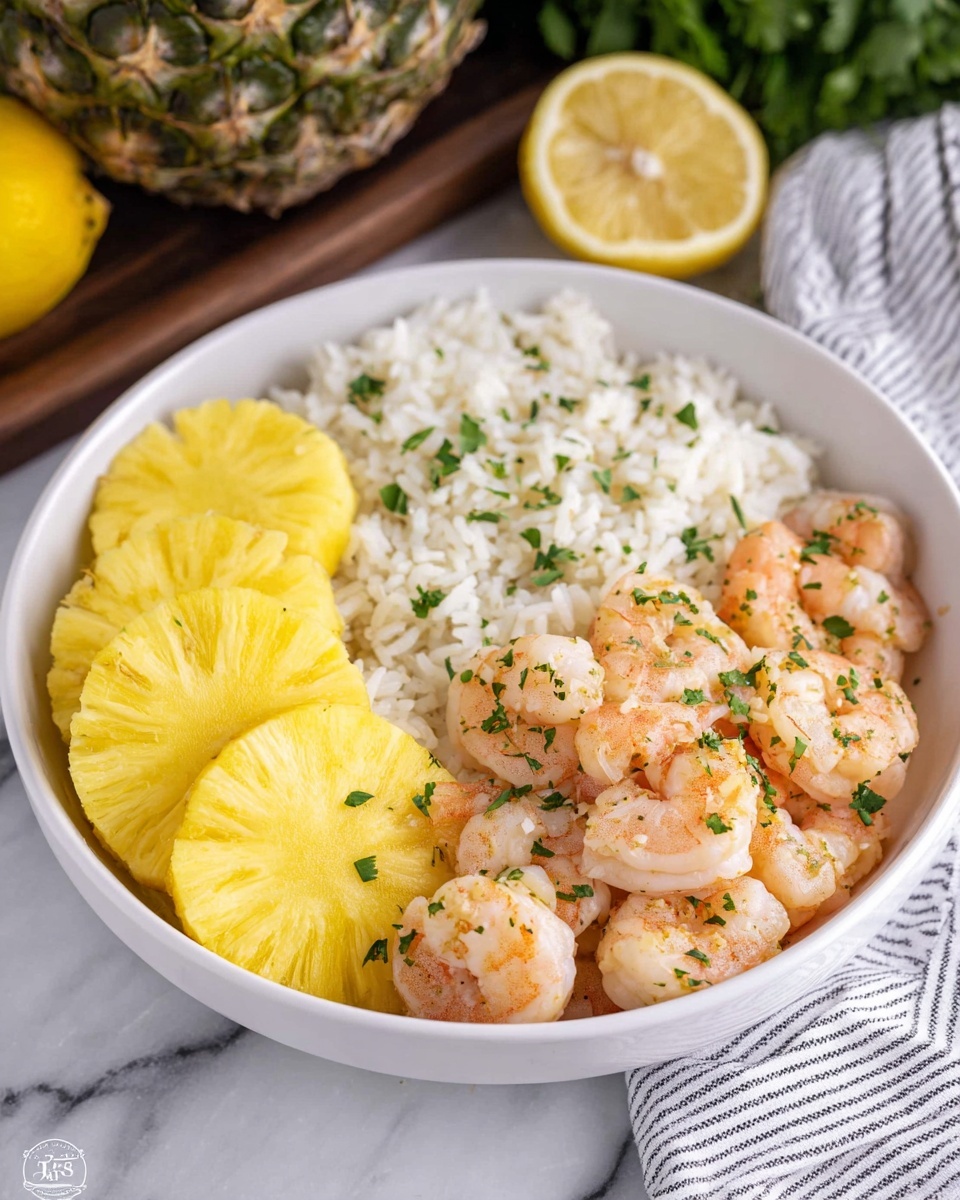
If you’re longing for a dish that bursts with bold flavors and a touch of tropical flair, you have to try this Air Fryer Hawaiian Garlic Shrimp Recipe. It combines the juiciness of perfectly cooked shrimp with a garlicky, buttery sauce that instantly transports your taste buds to a sunny Hawaiian beachside. The Air Fryer not only makes this recipe quick and effortless but also gives the shrimp an irresistible crispy texture that’s hard to beat. Whether you’re whipping up a weeknight dinner or impressing guests, this recipe will quickly become your new favorite way to enjoy shrimp.
Ingredients You’ll Need
These ingredients are simple yet essential, each playing a key role in delivering the authentic flavors and texture that make this dish so special. From the cornstarch that crisps up the shrimp to the melted butter that infuses every bite with richness, every component contributes to an unforgettable meal.
- Cornstarch: Creates a light, crispy coating on the shrimp that holds the flavors perfectly.
- Garlic powder: Adds a concentrated garlicky punch without overpowering the shrimp.
- Onion powder: Gives a subtle sweetness and depth to balance the garlic.
- Salt: Enhances every flavor and brings out the natural sweetness of the shrimp.
- Dried basil: Offers a hint of herbal brightness to elevate the dish.
- Large shrimp (peeled, deveined, dried): The star ingredient that soaks up all the flavors and cooks to juicy perfection.
- Cooking spray: Helps the shrimp crisp in the air fryer without excess oil.
- Salted butter (melted): Creates the luscious garlic butter sauce that coats each shrimp.
- Minced garlic: Adds freshness and vibrant aroma to the sauce.
- Lemon juice: Lifts the richness with a bright, tangy finish straight from fresh lemons.
How to Make Air Fryer Hawaiian Garlic Shrimp Recipe
Step 1: Preheat the Air Fryer
Start by preheating your air fryer to 390 degrees Fahrenheit. Preheating ensures that the shrimp cook evenly and develop that perfect crispiness. If your air fryer doesn’t require preheating, you can skip this, but I find it helps achieve the best texture.
Step 2: Mix the Dry Coating
In a small mixing bowl, combine the cornstarch, garlic powder, paprika, onion powder, salt, and dried basil. This blend is your secret weapon for adding flavor and crunch. Mixing it well ensures every shrimp will get an even coating.
Step 3: Coat the Shrimp
Make sure the shrimp are completely dry by blotting with paper towels—that’s important for crispiness! Then place them in a gallon-sized bag along with the dry mixture. Toss everything until the shrimp are thoroughly coated in that flavorful mix.
Step 4: Arrange the Shrimp in the Basket
Place the shrimp in a single layer in the air fryer basket. Don’t overcrowd them; working in batches if needed is better for even cooking. Spray the shrimp generously with cooking spray, which helps them become golden and crunchy.
Step 5: Cook the Shrimp
Air fry the shrimp at 390 degrees for 6-8 minutes, flipping halfway through the cooking time. After flipping, spray them again with cooking spray to maintain the perfect crispy texture. You’ll know they’re ready when they turn pink and curl tightly.
Step 6: Prepare the Garlic Butter Sauce
While the shrimp are getting perfectly cooked, mix together the melted butter, minced garlic, and fresh lemon juice. This sauce is what gives the dish that indulgent, buttery-garlic goodness that clings to every shrimp.
Step 7: Toss the Shrimp in the Sauce
Place the cooked shrimp in a large bowl and pour the garlic butter sauce over them. Toss gently to coat every piece in that heavenly sauce. This step infuses the shrimp with vibrant flavor and irresistible richness.
Step 8: Optional – Thicken the Sauce
If you prefer a thicker, clingier sauce, transfer the shrimp and sauce to a skillet over medium-high heat. Cook for 2-3 minutes, stirring frequently until the sauce thickens to your liking. This extra step is completely optional but highly recommended for sauce lovers.
Step 9: Serve Your Masterpiece
Remove the shrimp from the skillet or air fryer and get ready to enjoy! Serving with fluffy rice and your favorite garnishes takes this dish to the next level.
How to Serve Air Fryer Hawaiian Garlic Shrimp Recipe

Garnishes
A sprinkle of fresh chopped parsley adds a lovely pop of color and herbal freshness. A lemon wedge on the side is fantastic for squeezing a little extra brightness over everything, making those garlicky flavors shine even more.
Side Dishes
This garlic shrimp shines when paired with simple sides like steamed white rice, coconut rice, or even a fresh garden salad. The mild flavors of these sides balance the rich, buttery shrimp perfectly and round out the meal.
Creative Ways to Present
For a tropical twist, serve the shrimp over a bed of pineapple fried rice or alongside grilled pineapple slices. You could also pile the shrimp onto warm tortillas with a drizzle of creamy slaw for a delicious shrimp taco version. The possibilities are endless!
Make Ahead and Storage
Storing Leftovers
Place any leftover shrimp in an airtight container and store in the refrigerator. They will keep fresh for up to 2 days. It’s best to enjoy them within this time to maintain that perfect texture and flavor.
Freezing
You can freeze cooked shrimp in a freezer-safe container or bag for up to 1 month. Be sure to remove as much air as possible to prevent freezer burn. When ready to eat, thaw overnight in the refrigerator for best results.
Reheating
To reheat, use the air fryer at 350 degrees for about 3-4 minutes. This method warms the shrimp while helping them regain their crispiness. Avoid microwaving if possible, as it can make the shrimp rubbery and lose that wonderful crunch.
FAQs
Can I use frozen shrimp for this Air Fryer Hawaiian Garlic Shrimp Recipe?
Absolutely! Just make sure to thaw and pat dry the shrimp thoroughly before coating and cooking. Removing excess moisture is key to getting that crispy finish.
Is this recipe spicy?
No, this version is mild and focused on garlic and buttery flavors. However, you can always add a pinch of chili powder or crushed red pepper flakes if you want to bring some heat.
Can I make this recipe without an air fryer?
Yes, you can cook the coated shrimp in a hot skillet with a little oil for a similar crispy effect. However, the air fryer provides a healthier, hands-off approach with perfect crispness.
What can I serve instead of rice?
Try serving the shrimp with cauliflower rice or a light pasta to change things up. Even a fresh green salad or grilled vegetables would complement the bold garlic flavors nicely.
How do I make this dish keto-friendly?
Simply swap out the cornstarch for almond flour or coconut flour to keep it low-carb, and serve with a keto-friendly side like zucchini noodles or sautéed greens.
Final Thoughts
This Air Fryer Hawaiian Garlic Shrimp Recipe is truly a gem—easy to make, packed with flavor, and incredibly satisfying. The combination of crispy shrimp coated in garlicky butter with bright lemon juice creates a dish you’ll want to make again and again. I can’t wait for you to try it and see just how delicious and effortless shrimp can be when cooked this way. Your taste buds will thank you!
Print
Air Fryer Hawaiian Garlic Shrimp Recipe
- Prep Time: 10 minutes
- Cook Time: 7 minutes
- Total Time: 17 minutes
- Yield: 4 servings
- Category: Main Course
- Method: Air Frying
- Cuisine: Hawaiian
Description
This Air Fryer Hawaiian Garlic Shrimp recipe offers a quick, flavorful, and healthier way to enjoy succulent shrimp coated with a seasoned cornstarch mix and tossed in a rich garlic butter sauce with a zesty lemon kick. Perfect for a weeknight dinner, it’s ready in under 20 minutes and pairs beautifully with rice or a fresh salad.
Ingredients
Shrimp Coating
- 1/3 cup cornstarch
- 1 teaspoon garlic powder
- 1 teaspoon onion powder
- 1/2 teaspoon salt
- 1/2 teaspoon dried basil
- 1 pound large shrimp (peeled, deveined, and dried)
- Cooking spray
Garlic Butter Sauce
- 1/2 cup (1 stick) salted butter, melted
- 1 1/2 tablespoons minced garlic
- 1 1/2 tablespoons lemon juice (about one lemon)
Instructions
- Preheat Air Fryer: Preheat your air fryer to 390°F if your model requires preheating to ensure even cooking.
- Prepare Coating Mixture: In a small bowl, combine cornstarch, garlic powder, onion powder, salt, and dried basil to create a flavorful shrimp coating.
- Coat the Shrimp: Blot shrimp dry with paper towels. Place shrimp and the seasoning mixture in a gallon-sized bag and toss until shrimp are evenly coated.
- Arrange Shrimp in Basket: Lay the shrimp in a single layer in the air fryer basket. Use cooking spray generously to coat the shrimp before cooking. You may need to cook in batches to avoid overcrowding.
- Air Fry the Shrimp: Cook at 390°F for 6-8 minutes, flipping shrimp halfway through, and spraying again after flipping. Cook until shrimp are pink, tightly curled, and slightly crisp.
- Make Garlic Butter Sauce: While shrimp cooks, mix melted butter with minced garlic and fresh lemon juice in a bowl to make a vibrant garlic butter sauce.
- Toss Shrimp in Sauce: Transfer cooked shrimp to a large bowl and toss thoroughly with the garlic butter sauce so each piece is well coated.
- Optional Sauce Thickening: For a thicker sauce, heat a skillet over medium-high heat and cook shrimp with sauce for 2-3 minutes until the sauce thickens. This step is optional.
- Serve: Remove shrimp from heat and serve immediately with rice. Garnish with chopped parsley and a lemon wedge if desired for extra freshness.
Notes
- Make sure shrimp are thoroughly dried before coating for the best crispy texture.
- Cooking times might vary slightly depending on the air fryer model; adjust accordingly.
- Butter can be substituted with a non-dairy alternative to make the recipe dairy-free.
- Feel free to add a pinch of paprika or chili flakes to the coating for a spicy kick.
- Serve immediately for the best texture as shrimp can become soggy if left to sit.

