Description
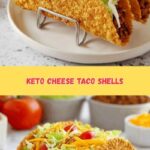
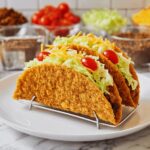
This Baked Cheese Keto Taco Shells recipe offers a low-carb, gluten-free alternative to traditional taco shells. Made from a blend of cheddar, Jack, and Parmesan cheeses combined with coconut flour and garlic salt, these crispy and flavorful shells are baked to perfection and shaped in a taco holder for an easy, delicious keto-friendly meal base.
Ingredients
Scale
Ingredients
- 1/2 cup coconut flour
- 1/2 cup cheddar cheese, shredded
- 1/2 cup Jack cheese, shredded
- 1/2 cup Parmesan cheese, shredded
- 1 teaspoon garlic salt with parsley
Instructions
- Mix Ingredients: In a large bowl, combine the coconut flour, shredded cheddar, Jack, and Parmesan cheeses, and garlic salt. Toss thoroughly to coat the cheeses evenly with the flour and garlic salt, ensuring a well-blended mixture.
- Form Circles: Line a cookie sheet with parchment paper. Scoop about 1/3 cup of the cheese mixture and place it on the parchment paper. Smooth it out into a circular shape approximately 5 inches in diameter.
- Prepare More Circles: Repeat this process to fit three cheese circles per cookie sheet, spaced evenly to allow for baking.
- Bake the Shells: Preheat your oven to 350°F (175°C) and bake the cheese circles for about 15 minutes until melted and firm.
- Shape Taco Shells: Remove the cheese circles from the oven and, while still hot, carefully take them off the parchment with a large spatula. Immediately transfer each one to the middle of a taco holder and gently push down the center to form the classic taco shell shape.
- Repeat Shaping: Continue removing, shaping, and placing the shells in the taco holder until all have been formed.
- Cool and Serve: Allow the shaped taco shells to cool completely on a tray. Once cool, fill them with your favorite taco ingredients and enjoy!
Notes
- Work quickly when shaping the shells as they harden as they cool.
- If you don’t have a taco holder, you can carefully drape the hot shells over an inverted bowl or any curved surface to form.
- Use parchment paper to prevent sticking and ease removal from the cookie sheet.
- These shells are best eaten the same day for maximum crispness but store in an airtight container if needed.