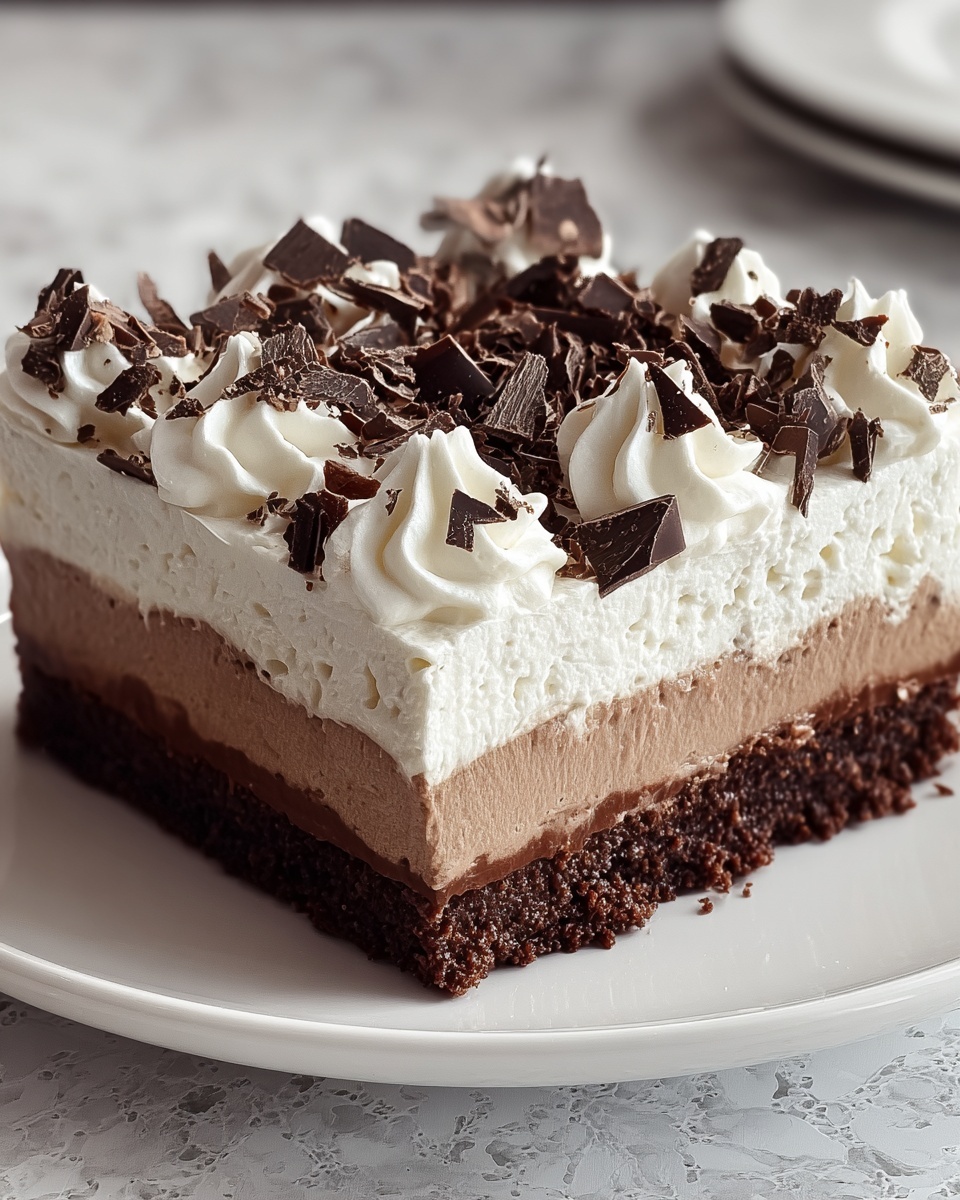
If you love rich, layered desserts that bring together the fudgy goodness of brownies and the creamy delight of pudding, then this Brownie Refrigerator Cake Recipe is about to become your new best friend in the kitchen. There is something truly magical about how the cool, luscious pudding and cream cheese layers rest on a moist brownie base, creating a dessert that’s both indulgent and refreshingly light. It’s perfect for gatherings, last-minute celebrations, or just a sweet treat to brighten your day.
Ingredients You’ll Need
Getting started is easy because the ingredients for this Brownie Refrigerator Cake Recipe are simple yet absolutely essential. Each one plays its role in creating layers of flavor and texture that make every bite unforgettable.
- Brownie mix: The foundation, providing that rich, chocolaty fudginess that everyone loves.
- Extra-large egg: Ensures the brownies have the perfect texture and bind beautifully.
- Cream cheese (softened): Adds tangy creaminess that balances the sweetness.
- Powdered sugar: Sweetens the cream cheese layer without graininess.
- Whipped topping (two 8 oz. containers): Lightens both the cream cheese and pudding layers for airy indulgence.
- Instant chocolate pudding mix: Brings in deep cocoa flavor and thickens beautifully.
- Instant vanilla pudding mix: Adds a subtle creamy sweetness that complements the chocolate.
- Milk (3 ½ cups): Essential for setting the pudding mixture to the right consistency.
- Hershey bar (grated) or chocolate syrup: For that finishing touch of chocolatey goodness and decoration.
How to Make Brownie Refrigerator Cake Recipe
Step 1: Prepare the Brownie Base
Start by baking the brownie mix as directed on the package, making sure to use an extra-large egg for perfect moisture and texture. Pour the batter into a 9×13-inch pan and bake until done, then let it cool completely. This step is crucial because a fully cooled brownie layer keeps the cream cheese and pudding layers from melting or slipping.
Step 2: Make the Cream Cheese Layer
Whip together the softened cream cheese and powdered sugar until silky and smooth. Then, gently fold in one container of whipped topping. This creates a fluffy, sweet layer that adds a tangy richness to contrast with the dense brownie. Spread this mixture evenly over the cooled brownie base for that luscious second layer.
Step 3: Prepare the Pudding Layer
In a large bowl, whisk together the chocolate and vanilla instant pudding mixes with milk until thickened. Let it rest for about 5 minutes so it sets properly. Then, carefully spread the pudding layer over the cream cheese layer, creating a smooth, velvety top that brings everything together.
Step 4: Add the Final Layer and Garnish
Your Brownie Refrigerator Cake Recipe is almost ready! Spread the second container of whipped topping on top of the pudding to add a cloud-like finishing touch. To make it extra special, sprinkle grated Hershey chocolate or drizzle chocolate syrup across the top. This adds texture, flavor, and of course, a little visual pizzazz.
Step 5: Chill and Serve
Cover the cake and pop it in the fridge for at least four hours. Patience pays off here; the longer it chills, preferably overnight, the better the layers set and the flavors meld. When ready, slice into generous squares and enjoy the perfect balance of rich and creamy in every bite.
How to Serve Brownie Refrigerator Cake Recipe
Garnishes
While the grated Hershey chocolate or chocolate syrup topping is classic, feel free to get creative! Fresh berries, a sprinkle of crushed nuts, or a dusting of cocoa powder can elevate your presentation and add exciting pops of flavor or texture without overwhelming the cake’s creamy layers.
Side Dishes
This cake is a dessert star in its own right, but if you’re serving a full spread, pair it with light sides like fresh fruit salad or a dollop of homemade whipped cream. A hot cup of coffee or a chilled glass of milk complements the richness perfectly, making each bite more enjoyable.
Creative Ways to Present
For special occasions, try serving this Brownie Refrigerator Cake Recipe in individual clear parfait glasses, layering brownie pieces, cream cheese mixture, and pudding. It’s elegant, easy to portion, and lets everyone admire the beautiful layers before diving in.
Make Ahead and Storage
Storing Leftovers
Leftover Brownie Refrigerator Cake keeps nicely in the refrigerator for up to 4 days. Just cover it tightly with plastic wrap or store it in an airtight container to prevent it from absorbing other fridge odors. It’s a dessert that actually benefits from sitting for flavors to meld even more!
Freezing
If you want to save some for later, you can freeze the cake in individual servings wrapped well to avoid freezer burn. Let thaw in the fridge overnight before serving—some textural differences may occur, but it still tastes delicious.
Reheating
This cake is best served chilled and does not require reheating. If you prefer, let it come to a cool room temperature for a few minutes before slicing to make cutting easier.
FAQs
Can I use homemade brownies instead of a mix?
Absolutely! Homemade brownies add a personal touch and can be customized with nuts or extra chocolate chips. Just be sure they’re fully cooled before adding the layers.
Is there a non-dairy option for the whipped topping?
Yes, many stores offer non-dairy whipped toppings made from coconut or soy. They work well in this recipe and keep the creamy texture intact.
Can I make this cake gluten-free?
Definitely! Look for a gluten-free brownie mix and pudding mixes to accommodate gluten-free needs without sacrificing any flavor.
How long should I let the pudding layer set?
About 5 minutes of resting after whisking is enough for the pudding to thicken properly before spreading over the cream cheese layer.
Can I prepare this cake a day in advance?
Yes, it actually tastes better after sitting overnight in the fridge, so preparing it a day ahead is a great idea and makes it perfect for entertaining.
Final Thoughts
Making this Brownie Refrigerator Cake Recipe is like giving yourself a dessert hug — it’s comforting, decadent, and so worth the little bit of effort. Whether you’re a seasoned baker or just looking for a no-fuss crowd-pleaser, this layered delight promises smiles and second helpings. Grab your ingredients and make it today; your taste buds will thank you.
Print
Brownie Refrigerator Cake Recipe
- Prep Time: 15 minutes
- Cook Time: 30 minutes
- Total Time: 4 hours 45 minutes
- Yield: 12-16 servings
- Category: Dessert
- Method: Baking
- Cuisine: American
Description
This Brownie Refrigerator Cake is a delightful no-bake layered dessert featuring a rich brownie base topped with creamy layers of sweetened cream cheese, a luscious blend of chocolate and vanilla pudding, and finished with whipped topping and chocolate garnish. Perfectly chilled, it offers a cool, decadent treat that’s easy to prepare and ideal for gatherings or special occasions.
Ingredients
Brownie Layer
- 1 box brownie mix (prepared according to package instructions)
- 1 extra-large egg (or as required by brownie mix)
Cream Cheese Layer
- 1 (8 oz.) package cream cheese, softened
- 1 cup powdered sugar
- 1 (8 oz.) container whipped topping
Pudding Layer
- 1 (3 oz.) package instant chocolate pudding
- 1 (3 oz.) package instant vanilla pudding
- 3 ½ cups milk
- 1 (8 oz.) container whipped topping
Topping
- 1 Hershey bar (grated) or chocolate syrup for drizzling
Instructions
- Prepare the Brownie Base: Preheat your oven according to the brownie mix package instructions. Prepare the brownie batter using the box mix and one extra-large egg. Pour it into a greased 9×13-inch pan and bake as directed. Once done, allow the brownies to cool completely before layering.
- Make the Cream Cheese Layer: In a mixing bowl, beat the softened cream cheese with powdered sugar until smooth and creamy. Carefully fold in one 8 oz. container of whipped topping until fully incorporated. Spread this mixture evenly over the cooled brownie layer.
- Prepare the Pudding Layer: In a separate bowl, whisk together the instant chocolate pudding, instant vanilla pudding, and 3 ½ cups of milk. Let the mixture sit and thicken for about 5 minutes. Once thickened, spread it evenly over the cream cheese layer.
- Final Layer & Garnish: Spread the second 8 oz. container of whipped topping over the pudding layer to create a smooth final layer. Grate a Hershey bar over the top or drizzle with chocolate syrup to garnish your cake.
- Chill & Serve: Cover the cake and refrigerate for a minimum of 4 hours, preferably overnight, to let the layers set and flavors meld. Slice into servings and enjoy the chilled dessert.
Notes
- Ensure the brownies are completely cooled before adding the cream cheese layer to prevent melting.
- For a richer pudding layer, consider using whole milk.
- You can use chocolate syrup if you don’t have a Hershey bar for garnish.
- This dessert is best served chilled and can be stored in the refrigerator for up to 3 days.
- Feel free to substitute whipped topping with homemade whipped cream for a fresher taste.


