There is something irresistibly comforting about a rich, creamy cheesecake that just melts in your mouth, and this Classic Cheesecake Recipe delivers exactly that. With its perfectly browned butter graham cracker crust and luscious, smooth cream cheese filling, this cheesecake is the kind of dessert that instantly feels like a warm hug from your oven. Whether it’s a special occasion or a weekend treat, mastering this Classic Cheesecake Recipe will give you a dessert that’s gloriously versatile and endlessly satisfying.
Ingredients You’ll Need
These ingredients are wonderfully simple, but each one plays an essential role in building the taste, texture, and beautiful color of the cheesecake. From creamy full-fat cream cheese to tangy lemon juice and nutty browned butter, each element works in harmony to create that perfect slice.
- Butter (1 stick): Used twice—once for the crust and again browned for extra depth and a nutty flavor in the filling.
- Graham crackers (18 full sheets): Crushed finely for the base, providing a crisp, buttery foundation.
- Granulated sugar: Sweetens both the crust and luscious filling, balancing richness with subtle sweetness.
- Kosher salt: Enhances all the flavors and cuts through the richness to keep each bite balanced.
- Full fat sour cream (3/4 cup): Adds tang and creamy texture, helping to make the filling extra smooth.
- Large eggs + 1 egg yolk: Binds the filling while adding richness and structure for that creamy yet sliceable consistency.
- Vanilla extract (2 teaspoons): Infuses a warm, sweet aroma that’s classic to any cheesecake.
- Lemon juice (1½ tablespoons): A fresh citrus twist that brightens the dense cream cheese mixture perfectly.
- Full fat cream cheese (4 packages, 8 ounces each): The star of the show, providing the signature smooth and tangy flavor of a classic cheesecake.
How to Make Classic Cheesecake Recipe
Step 1: Soften the Cream Cheese and Prepare Eggs
Start by letting your cream cheese come to room temperature—this step is absolutely crucial! Soft cream cheese whips up beautifully and prevents lumps in your batter, which means a silky smooth cheesecake every time. While your cream cheese softens, also let the eggs sit out to reach room temperature. This helps everything blend together evenly and prevents curdling.
Step 2: Brown the Butter for the Crust
Transform your butter by browning it in a small pot over medium heat. Look out for those golden brown milk solids that swirl around; they bring a lovely toasty, nutty note to the crust that elevates this Classic Cheesecake Recipe. Just don’t let it burn! Once browned, let it cool while you prep the crust ingredients.
Step 3: Prepare and Bake the Graham Cracker Crust
Crush the 18 sheets of graham crackers into fine crumbs using a food processor or by smashing them in a sealed bag. Mix these crumbs with sugar, salt, and the cooled browned butter until moistened. Press the mixture snugly into your springform pan, pushing it up the sides to form a sturdy base that will hold your luscious filling perfectly. Bake it at 325°F for 12 minutes and then set aside to cool completely.
Step 4: Brown the Butter for the Filling
Repeat the butter browning process for the filling. Using the same pot keeps that deep, buttery flavor consistent throughout. Allow this butter to cool to avoid cooking the eggs when you mix it later on.
Step 5: Mix the Sour Cream and Egg Mixture
In a large bowl or your stand mixer, whisk together the sour cream, eggs plus one egg yolk, vanilla extract, lemon juice, and salt vigorously for at least 2 minutes. This step ensures your mixture is smooth with no odd egg lumps, which can affect the texture of your cheesecake. If you spot any weird solids, it’s best to discard them for a flawless texture.
Step 6: Combine Browned Butter and Sour Cream Mixture
Slowly drizzle the cooled browned butter into your sour cream mixture while mixing to avoid scrambling the eggs. This step imparts a luscious, deep flavor that gives the cheesecake its rich complexity.
Step 7: Beat the Cream Cheese and Sugar
Without washing your bowl, whisk the softened cream cheese until smooth and creamy, taking care not to overbeat which can introduce too much air. Add sugar and beat just until combined. Lumps here will show up in your cake, so smoothness is key. This is where this Classic Cheesecake Recipe starts to come alive.
Step 8: Combine All Mixtures and Pour Into Crust
Gently mix the sour cream-butter blend into the cream cheese base, folding carefully to maintain that smooth texture. For obsessively perfect cheesecakes, you can strain the batter before pouring it into the cooled crust, but it’s totally optional. Tap the pan on your counter a few times to remove air bubbles, then poke any lingering ones with a toothpick.
Step 9: Bake with Steam
This step is the secret to a crack-free cheesecake. Set a pan of boiling water on the bottom rack of your preheated oven and place your cheesecake on the middle rack right above. The steam gently bakes the cheesecake evenly for about 70 minutes. Resist the urge to open the oven door—that wait is crucial as it finishes baking gently with residual heat once the oven is off and door remains closed.
Step 10: Cooling and Chilling
Leave the cheesecake in the turned-off oven for at least 4 hours, ideally overnight. This gradual cooldown prevents cracks and creates that classic dense but creamy texture. Afterward, refrigerate for an additional 4-8 hours, allowing flavors to meld and the cheesecake to set perfectly.
How to Serve Classic Cheesecake Recipe
Garnishes
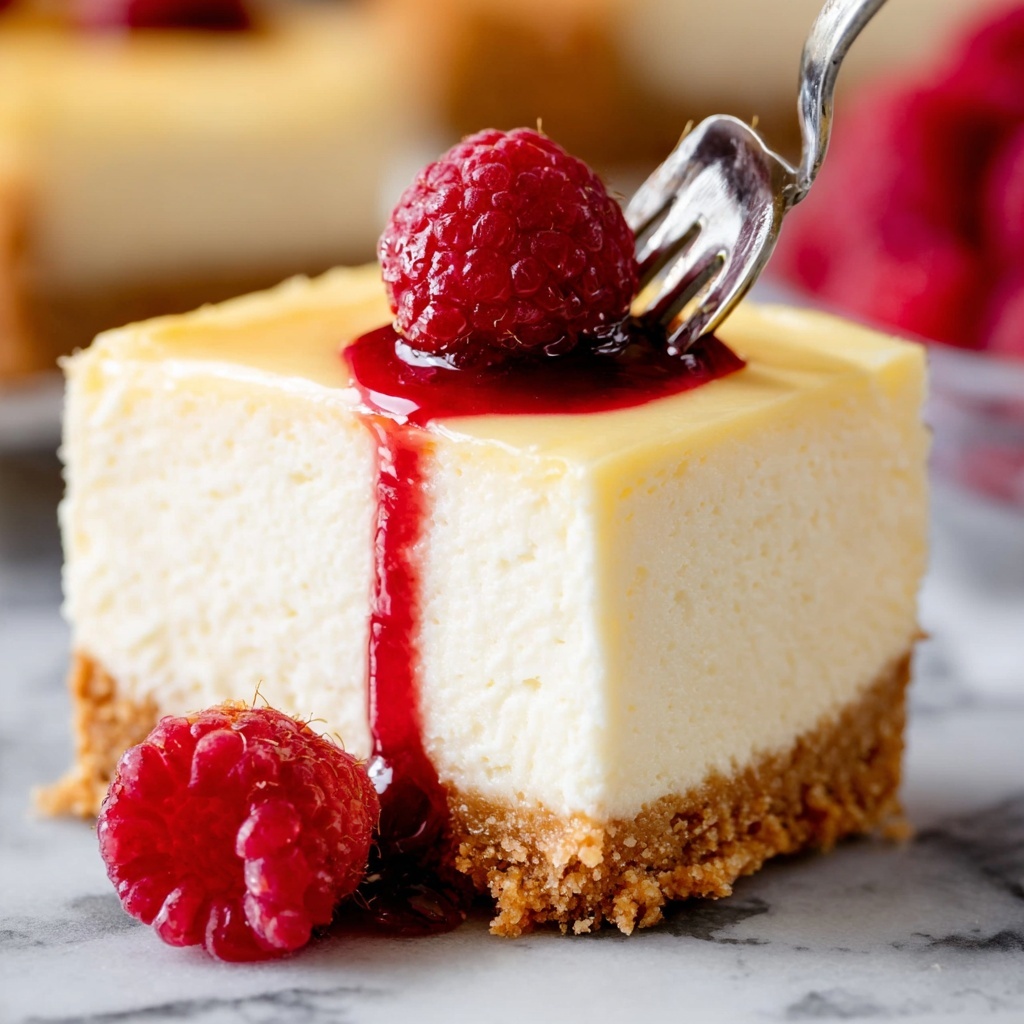
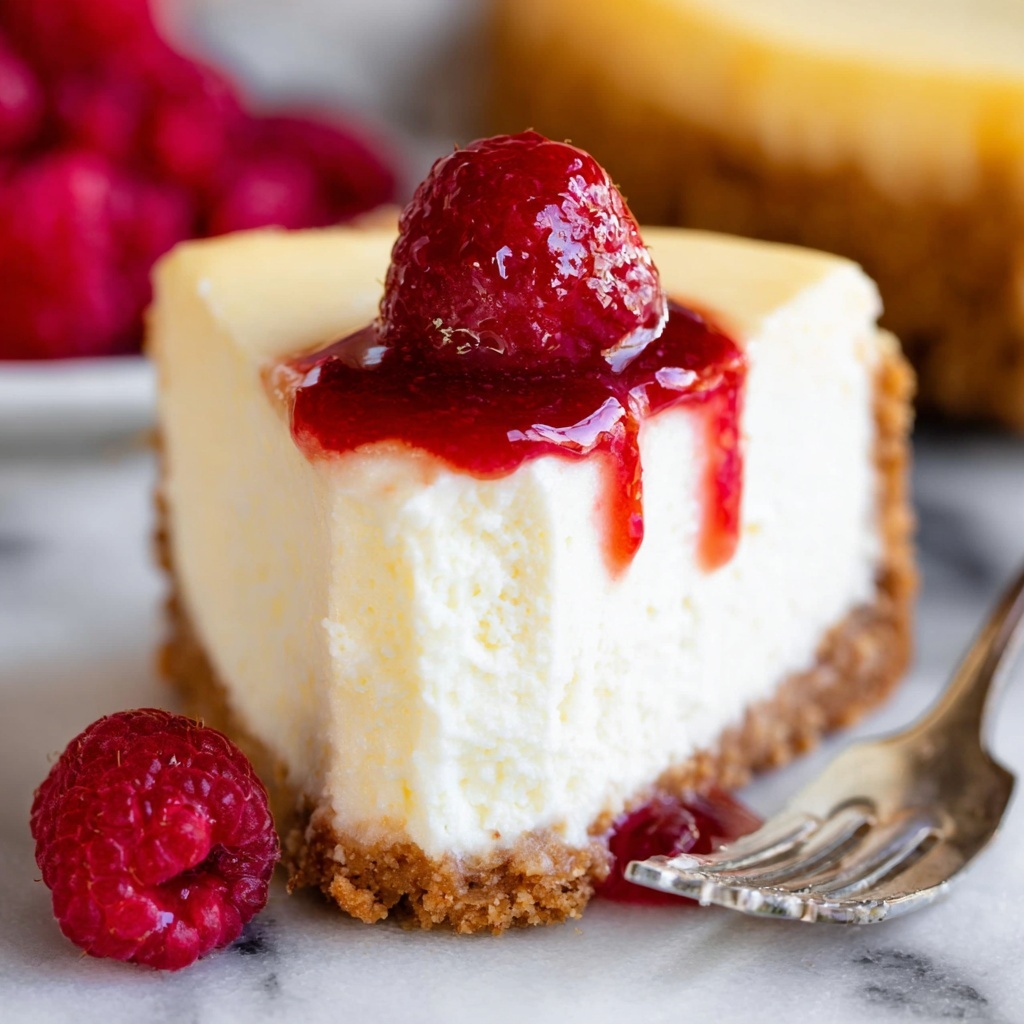
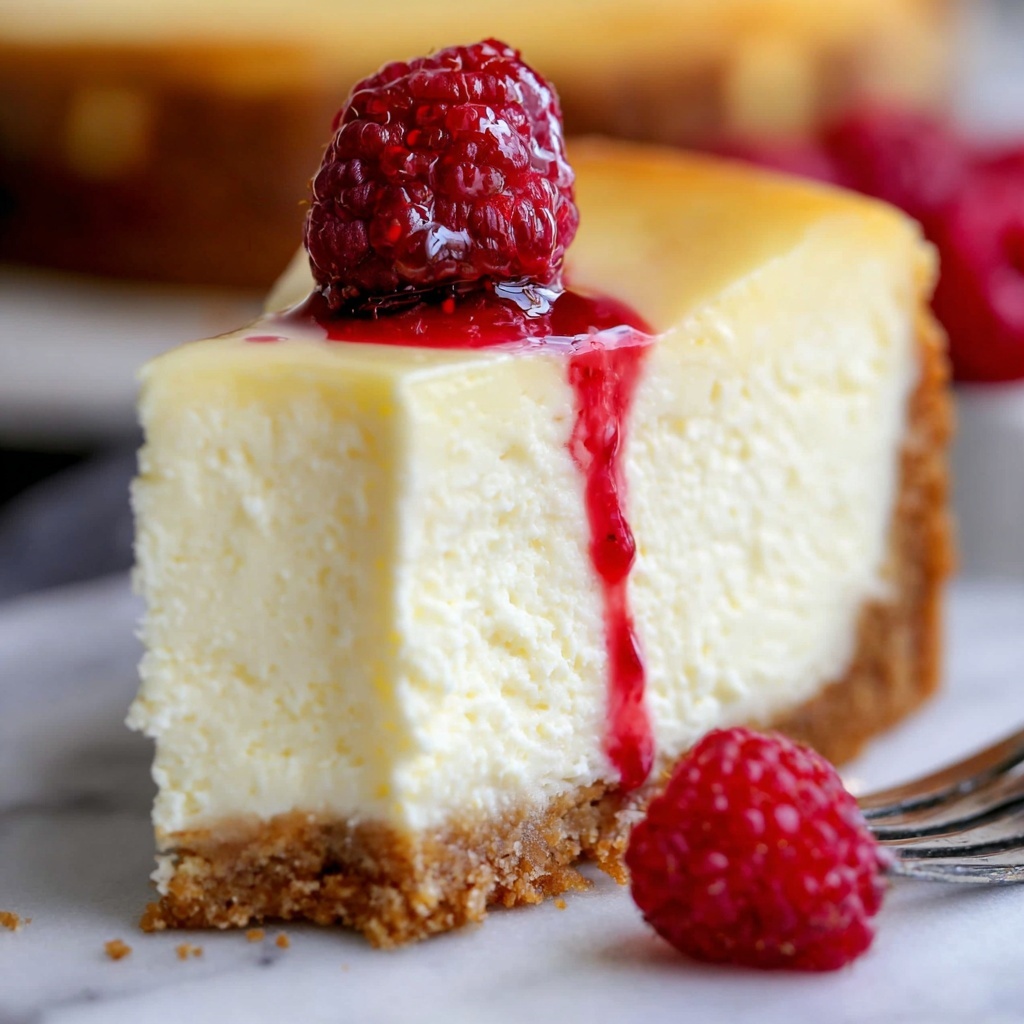
Fresh fruit toppings like raspberries, strawberries, or a zesty lemon curd complement the cheesecake’s rich tang beautifully. For a decadent twist, try salted caramel or a shiny chocolate ganache drizzle. Adding a sprinkle of sea salt on caramel gives a sophisticated balance to the sweetness.
Side Dishes
Classic cheesecakes pair wonderfully with light and fresh sides like a mixed green salad with vinaigrette or a simple cup of hot coffee or tea to mellow the richness. If serving at a gathering, a scoop of vanilla bean ice cream is a delightfully indulgent companion.
Creative Ways to Present
Try serving mini versions in individual jars or mason jars for a cute, portable dessert. Layer fruit coulis between slices or dust with cocoa powder or cinnamon for an unexpected garnish. For a festive occasion, top with holiday cranberry sauce or edible flowers for a beautiful, crowd-pleasing presentation.
Make Ahead and Storage
Storing Leftovers
Wrap your cheesecake tightly and refrigerate leftover slices for 2-3 days. The crust may soften slightly over time, but the smooth filling stays deliciously creamy, making for excellent next-day indulgence.
Freezing
If you want to keep your cheesecake longer, freezing works wonderfully. Wrap the entire cheesecake in plastic wrap then foil, and freeze for up to 3-4 months. Thaw in the refrigerator for 12-24 hours. For individual slices, flash freeze them first on a tray, then wrap each slice separately to maintain their shape and freshness.
Reheating
Cheesecake is best enjoyed chilled, so avoid reheating. But if you want a slightly softer slice, take it out of the fridge 15-20 minutes before serving to let it come gently to room temperature.
FAQs
Can I use low-fat cream cheese for this Classic Cheesecake Recipe?
It’s best to use full-fat cream cheese to ensure that smooth, rich texture that defines a classic cheesecake. Low-fat versions can be too watery or curdle when baked.
Why do I need to brown the butter for the crust and filling?
Browned butter adds a deep, nutty flavor that elevates the crust and filling beyond ordinary. It’s a simple step that transforms the taste profile beautifully.
How do I avoid cracks in my cheesecake?
Using a water bath or baking with steam and cooling the cheesecake gradually in the oven are your best bets. These methods add moisture and gentle heat, reducing cracking dramatically.
Can I make this Classic Cheesecake Recipe gluten-free?
Absolutely! Substitute the graham crackers with gluten-free varieties or crushed gluten-free cookies for the crust. The rest of the recipe stays the same.
Is it necessary to wait for the cheesecake to chill for 8 hours?
While you can serve it after 4 hours of chilling, letting it chill longer helps the flavors meld and the texture become more set and creamy, which is worth the wait.
Final Thoughts
Making this Classic Cheesecake Recipe is like inviting a little magic into your kitchen—simple ingredients combined with care and patience yield a dessert that’s comforting and elegant all at once. Whether you’re baking for loved ones or treating yourself, this cheesecake promises to be a cherished favorite. So go ahead, dive into the process and enjoy every luscious bite!
Print
Classic Cheesecake Recipe
- Prep Time: 60 minutes
- Cook Time: 60 minutes
- Total Time: 10 hours 0 minutes
- Yield: 12 servings
- Category: Dessert
- Method: Baking
- Cuisine: American
Description
This classic cheesecake recipe delivers a rich, creamy dessert with a perfectly buttery graham cracker crust and a smooth, luscious filling made with full-fat cream cheese, sour cream, eggs, and browned butter for a nutty depth of flavor. The cheesecake is baked in a steam water bath to maintain moisture and avoid cracks, resulting in a velvety texture and a delicate lemon-vanilla aroma. Ideal for holiday celebrations or any indulgent occasion, this cheesecake can be topped with fresh fruit, ganache, or caramel for a personalized touch.
Ingredients
Crust
- 1/2 cup (1 stick) unsalted butter
- 18 full sheets graham crackers (about 2 cups crushed crumbs)
- 1/4 cup granulated sugar
- 1/2 teaspoon kosher salt
Filling
- 4 (8-ounce) packages full fat cream cheese, softened (Philadelphia brand recommended)
- 1/2 cup (1 stick) unsalted butter
- 3/4 cup full fat sour cream
- 3 large eggs plus 1 egg yolk, all at room temperature
- 2 teaspoons vanilla extract
- 1 1/2 tablespoons fresh lemon juice (about 1/2 lemon)
- 1/2 teaspoon kosher salt
- 2 cups granulated sugar
Instructions
- Soften Cream Cheese and Eggs: Let your cream cheese sit out at room temperature for at least 1-2 hours until soft and lump-free. Similarly, bring your eggs to room temperature to ensure smooth mixing.
- Brown Butter for Crust: Melt 1/2 cup butter over medium heat in a small pot. Stir occasionally as it foams and milk solids brown, developing a nutty aroma. Remove from heat promptly once browned bits appear. Cool for at least 30 minutes.
- Preheat Oven and Prepare Crust: Set oven to 325°F. Crush graham crackers finely using a food processor or rolling pin. Mix graham crumbs with sugar and salt.
- Combine Crust Ingredients: Add cooled browned butter to graham cracker mixture and thoroughly combine until crumbs are moistened.
- Form Crust in Pan: Spray a 9-inch springform pan with nonstick spray. Press crumb mixture firmly into bottom and up sides (~1 inch) to create a tight crust.
- Bake Crust: Bake crust at 325°F for 12 minutes. Cool completely. Optionally, wrap pan for water bath later.
- Brew Second Batch of Browned Butter: Brown remaining 1/2 cup butter in same pot. Set aside to cool.
- Mix Wet Ingredients: In a large bowl or stand mixer, whisk sour cream, eggs + yolk, vanilla, lemon juice, and 1/2 tsp salt for at least 2 minutes until smooth and free of curdled egg bits.
- Add Browned Butter to Wet Mix: Slowly pour cooled butter into wet mixture while mixing to avoid scrambling eggs. Combine well.
- Prepare Cream Cheese Base: Without cleaning bowl, beat softened cream cheese until smooth and creamy, avoiding overbeating. Add sugar and mix just until combined.
- Combine Mixtures: Add sour cream-butter mixture to cream cheese mixture and beat until smooth without lumps.
- Fill Crust: Pour batter into cooled crust. Tap pan on counter to release air bubbles; wait 10 minutes and pop any visible bubbles with a toothpick.
- Prepare Water Bath: Boil large pot of water. Place a metal 9×13 pan on lowest oven rack; place second rack in center. Oven remains at 325°F.
- Bake with Steam: Place cheesecake on center rack. Carefully pour boiling water into pan on lowest rack, filling halfway up sides. Return racks and close oven door quickly.
- Bake 70 Minutes: Bake undisturbed for 70 minutes. Do not open oven door.
- Turn Off Oven: After 70 minutes, turn oven off but keep door shut. Cheesecake will still wobble; let it finish baking in residual heat.
- Cool in Oven: Leave cheesecake in oven with door closed for at least 4 hours or overnight until completely cooled to room temperature.
- Refrigerate: Transfer cheesecake to refrigerator for 4–8 hours for full chilling.
- Release and Slice: Carefully remove springform ring. Slice with sharp knife, wiping blade between cuts for clean slices.
- Serve: Serve chilled with toppings like fresh raspberries, strawberry topping, lemon curd, caramel, ganache, or cranberry sauce as desired.
- Store Leftovers: Keep covered in refrigerator for 2–3 days to prevent soggy crust.
- Freeze Instructions: To freeze whole cheesecake, cool completely, wrap tightly in plastic wrap and foil, freeze up to 3–4 months. Thaw in fridge 12–24 hours. For slices, flash freeze separated slices 3 hours, then wrap individually and freeze.
Notes
- Using browned butter in both crust and filling adds a rich, nutty flavor depth.
- Bringing cream cheese and eggs to room temperature helps achieve a smooth, lump-free batter.
- Baking cheesecake in a steam water bath prevents cracks and creates a silky texture.
- If not concerned about cracks, you can skip the water bath and bake directly.
- Smoothing out air bubbles after pouring the batter avoids holes in the final cheesecake.
- Do not open the oven during baking or cooling to prevent temperature fluctuations and cracks.
- Not covering while initially refrigerating avoids condensation on cheesecake surface.
- Leftover cheesecake crust may get soggy after a few days; consume within 2–3 days for best texture.
- Freezing cheesecake requires thorough wrapping to prevent freezer burn and preserve texture.


