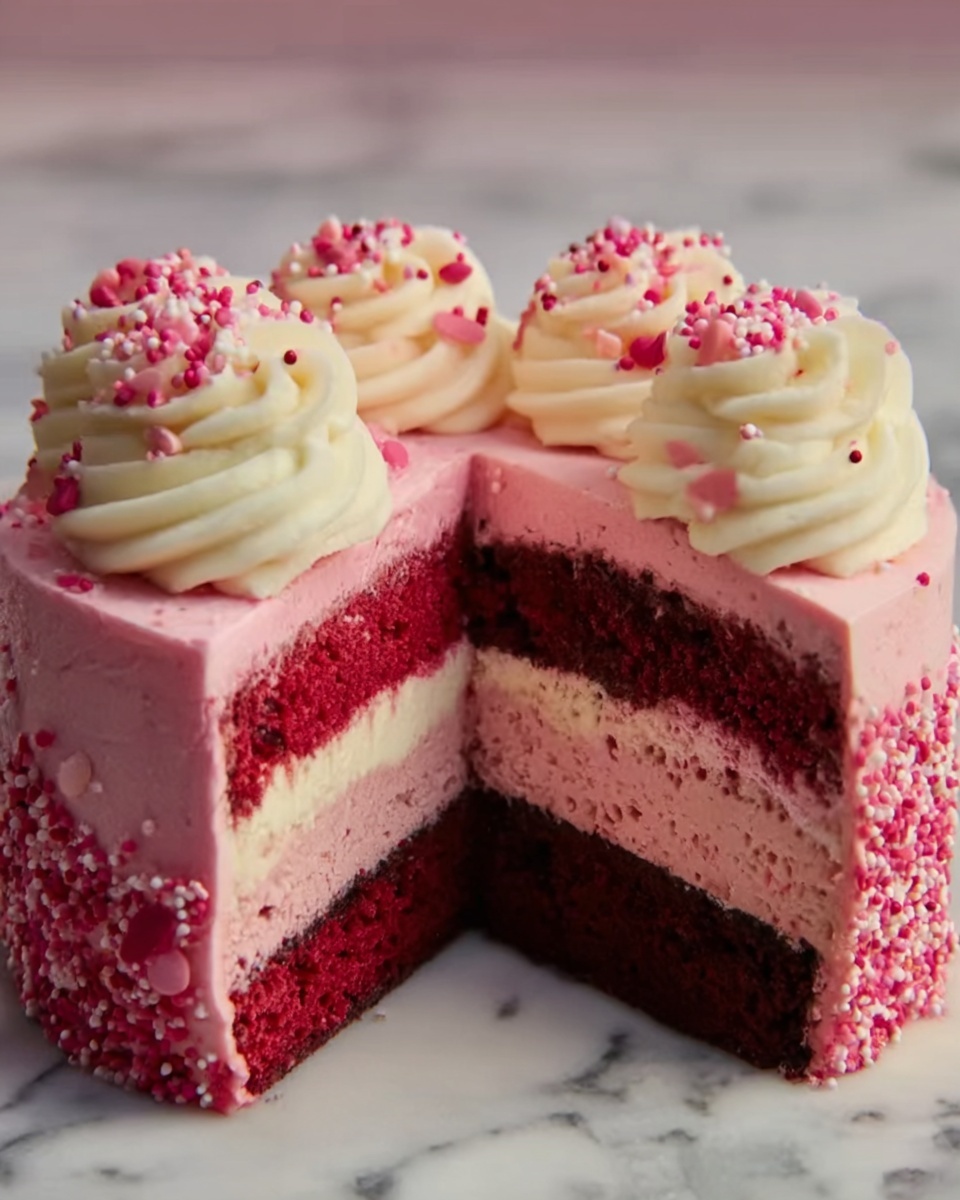
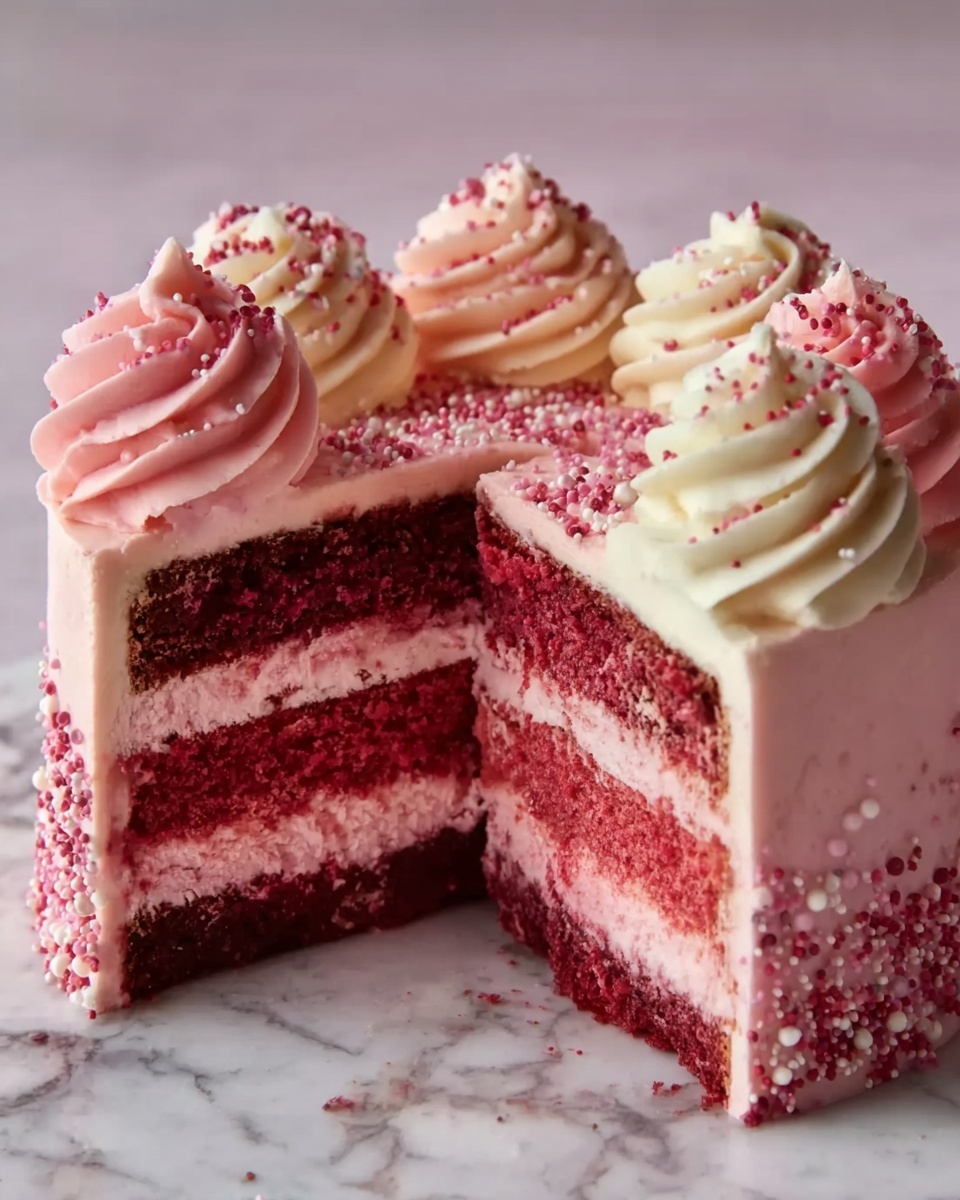
If you’ve ever dreamed of a cake that is both stunning and utterly delicious, let me introduce you to the Pink Velvet Dream Cake Recipe. This delightful dessert dazzles with its soft pink hue and moist texture, complemented perfectly by a luscious cream cheese frosting. It’s not just a cake; it’s a celebration on your plate, perfect for special occasions or whenever your sweet tooth calls for something truly magical. The Pink Velvet Dream Cake Recipe is wonderfully simple yet impressively elegant, promising smiles from the first slice to the last crumb.

Ingredients You’ll Need
Gathering your ingredients is the first step to crafting this beautiful cake. Each component plays a crucial role in building the perfect texture, flavor, and of course, that captivating pink color that makes this cake so special.
- 2 1/2 cups all-purpose flour: This forms the base of the cake, providing structure and a tender crumb.
- 1 1/2 cups granulated sugar: Adds the essential sweetness and helps create moisture in the crumb.
- 1 tsp baking soda: The leavening agent that helps the cake rise light and fluffy.
- 1 tsp salt: Balances the sweetness and enhances the overall flavor.
- 1 tsp cocoa powder: Just a touch to deepen the flavor and aid in color contrast.
- 1 1/2 cups vegetable oil: Keeps the cake moist and tender without overpowering flavor.
- 1 cup buttermilk, room temperature: Adds tanginess and reacts with the baking soda for perfect rise.
- 2 large eggs, room temperature: Bind everything together and contribute to richness.
- 2 tbsp red food coloring: The star ingredient for that signature pink blush.
- 1 tsp white vinegar: Reacts with baking soda for lift, and brightens flavors.
- 1 tsp vanilla extract: Adds warmth and depth to the overall flavor.
- Cream cheese frosting: The luscious, tangy topping that ties everything together beautifully.
How to Make Pink Velvet Dream Cake Recipe
Step 1: Preparing the Pans and Oven
Start by preheating your oven to 350°F (175°C). Properly greasing and flouring two 9-inch round cake pans is essential to ensure your cake layers come out effortlessly without any sticking. This set-up step lays the groundwork for a smooth baking experience.
Step 2: Mixing Dry Ingredients
In a medium bowl, sift together the all-purpose flour, sugar, baking soda, salt, and cocoa powder until the mixture is uniform and smooth. This ensures even distribution of everything and helps avoid clumps that can affect texture.
Step 3: Combining Wet Ingredients
In a separate large mixing bowl, whisk together vegetable oil, buttermilk, eggs, red food coloring, white vinegar, and vanilla extract. Stir until the mixture is completely blended and glossy, setting the stage for a vibrant batter.
Step 4: Bringing It All Together
Gradually add the dry ingredients to your wet mixture. Stir gently but thoroughly to avoid lumps, aiming for a smooth batter that’s vibrant pink and ready to pour. It’s so satisfying to see the color come alive at this stage!
Step 5: Baking the Cake Layers
Divide the batter evenly between your prepared cake pans. Bake for 25 to 30 minutes or until a toothpick inserted in the center comes out clean. The aroma filling your kitchen as they bake is truly enchanting.
Step 6: Cooling Time
Allow the cakes to rest in the pans for about 10 minutes after baking. Then gently transfer them onto a wire rack to cool completely. This prevents moisture buildup and ensures the frosting layer won’t slide off.
Step 7: Frosting and Final Assembly
Once the cake layers have cooled fully, spread a generous layer of cream cheese frosting on top of one, carefully stack the second layer, then slather the whole cake with frosting, including the sides for that luscious finish. The cream cheese frosting perfectly complements the subtle cocoa undertone and gives your Pink Velvet Dream Cake Recipe that dreamy allure.
How to Serve Pink Velvet Dream Cake Recipe
Garnishes
Enhance the visual and flavor appeal of your Pink Velvet Dream Cake Recipe by adding fresh raspberries, edible rose petals, or delicate sprinkles on top. These garnishes not only add a splash of color but also a subtle texture contrast and extra flair to your presentation.
Side Dishes
Serve your cake with a scoop of vanilla bean ice cream or a dollop of freshly whipped cream to complement the creamy frosting. A cup of hot coffee or a glass of chilled rosé pairs beautifully, elevating your dessert experience further.
Creative Ways to Present
Consider cutting the cake into charming mini squares or layering it in clear glass jars for a trendy twist. Personalize each portion by adding a drizzle of raspberry coulis or a sprinkle of toasted almonds for an elegant touch that will wow your guests.
Make Ahead and Storage
Storing Leftovers
Your Pink Velvet Dream Cake Recipe leftovers store best when covered tightly with plastic wrap or placed in an airtight container. Keeping it refrigerated ensures the cream cheese frosting stays fresh and the cake remains moist for up to 3 days.
Freezing
To freeze, wrap the cake tightly in plastic wrap followed by a layer of aluminum foil or place individual slices in freezer-safe containers. Frozen properly, your cake can keep its flavor and texture intact for up to 2 months.
Reheating
When you’re ready to enjoy frozen cake, allow it to thaw overnight in the refrigerator. For a just-baked feel, briefly warm individual slices in the microwave for 10 to 15 seconds, but avoid overheating to keep the frosting intact.
FAQs
Can I use regular milk instead of buttermilk?
While regular milk can work in a pinch, buttermilk is key to the Pink Velvet Dream Cake Recipe’s tender crumb and subtle tang. If you don’t have buttermilk, try adding a tablespoon of vinegar or lemon juice to milk and letting it sit for 5 minutes before using.
Is the red food coloring necessary?
The red food coloring gives this cake its signature pink color that makes it stand out visually. Without it, the cake will look more like a traditional velvet cake but will still taste delicious.
Can I make this cake gluten-free?
You can substitute all-purpose flour with a gluten-free flour blend designed for baking. Results may vary slightly in texture, so choose a blend that includes xanthan gum or similar binding agents.
What frosting pairs best with Pink Velvet Dream Cake Recipe?
Cream cheese frosting is the perfect companion to this cake. Its tangy richness balances the sweet, moist layers perfectly, making every bite heavenly.
How long does the cake stay fresh?
When stored properly in the refrigerator, your Pink Velvet Dream Cake Recipe will stay fresh and delicious for up to 3 days. Beyond that, freezing is your best option to maintain quality.
Final Thoughts
There is something truly special about the Pink Velvet Dream Cake Recipe—it’s cake that feels like a hug, a celebration, and a treat all rolled into one. Whether you’re an experienced baker or trying something new, this recipe is approachable and rewarding. Give it a try and watch as it becomes a beloved staple in your dessert repertoire, brightening up every occasion with its charming pink glow and unforgettable taste.
Print
Pink Velvet Dream Cake Recipe
- Prep Time: 20 minutes
- Cook Time: 30 minutes
- Total Time: 50 minutes
- Yield: 12 servings
- Category: Dessert
- Method: Baking
- Cuisine: American
Description
This Pink Velvet Dream Cake is a moist and tender treat with a delicate cocoa flavor and vibrant red color. Perfectly layered with rich cream cheese frosting, this cake is ideal for celebrations or any time you want a beautiful and delicious dessert. Made with simple ingredients and baked to perfection, it offers a delightful twist on the classic red velvet cake.
Ingredients
Cake Ingredients
- 2 1/2 cups all-purpose flour
- 1 1/2 cups granulated sugar
- 1 tsp baking soda
- 1 tsp salt
- 1 tsp cocoa powder
- 1 1/2 cups vegetable oil
- 1 cup buttermilk, room temperature
- 2 large eggs, room temperature
- 2 tbsp red food coloring
- 1 tsp white vinegar
- 1 tsp vanilla extract
Cream Cheese Frosting
- cream cheese frosting (store-bought or homemade)
Instructions
- Preheat and Prepare Pans: Preheat your oven to 350°F (175°C). Grease and flour two 9-inch round cake pans to ensure the cakes don’t stick and come out easily after baking.
- Sift Dry Ingredients: In a medium bowl, sift together the all-purpose flour, granulated sugar, baking soda, salt, and cocoa powder. This helps to combine the ingredients evenly and makes the batter smooth.
- Mix Wet Ingredients: In a large mixing bowl, combine vegetable oil, room temperature buttermilk, eggs, red food coloring, white vinegar, and vanilla extract. Mix well until the mixture is smooth and fully incorporated.
- Combine Wet and Dry Mixtures: Gradually add the dry ingredients to the wet ingredients, stirring gently until the batter is smooth and free from lumps. Avoid overmixing to keep the cake tender.
- Divide and Bake: Evenly divide the batter between the two prepared cake pans. Place in the preheated oven and bake for 25-30 minutes, or until a toothpick inserted into the center of the cakes comes out clean.
- Cool the Cakes: Allow the cakes to cool in their pans for about 10 minutes. Then, carefully transfer them to a wire rack to cool completely before frosting.
- Frost the Cake: Once the cakes are completely cooled, frost the top of one layer generously with cream cheese frosting. Place the second cake layer on top, then frost the entire cake, including the sides, for a smooth and beautiful finish.
Notes
- Make sure the eggs and buttermilk are at room temperature for the best texture and to help combine ingredients smoothly.
- Red food coloring is essential for the signature pink velvet color; use gel food coloring for a more vibrant hue and less liquid.
- Use high-quality cream cheese frosting for a rich and tangy complement to the sweet cake.
- Allow the cake layers to cool completely before frosting to prevent the frosting from melting or sliding off.
- The vinegar reacts with the baking soda to help the cake rise and create a tender crumb.
- For even baking, rotate the cake pans halfway through baking if your oven has hot spots.


