Description
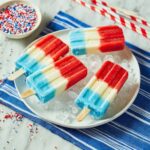
These Red White and Blue Popsicles are a fun and patriotic frozen treat made from creamy white chocolate pudding tinted with vibrant food coloring. Perfect for summer days or festive celebrations, they combine layers of red, white, and blue pudding for a visually striking and delicious dessert that’s easy to prepare without any cooking required.
Ingredients
Scale
White Chocolate Pudding Base
- 3 boxes white chocolate instant pudding (3.3 ounces each)
- 5 cups whole milk
Coloring
- Red food coloring
- Blue food coloring
Instructions
- Combine Pudding and Milk: In a large bowl, mix the white chocolate instant pudding mixes with the whole milk until smooth and well combined.
- Whisk Thoroughly: Whisk the mixture vigorously until it thickens and the pudding is fully incorporated.
- Divide Pudding: Transfer the pudding evenly into three separate bowls to prepare for coloring.
- Add Red Color: Stir red food coloring into one of the bowls, adjusting the amount until you achieve your desired shade of red.
- Add Blue Color: Similarly, whisk blue food coloring into the second bowl until the color is vibrant and even.
- Keep One Bowl White: Leave the third bowl with the plain white pudding as is, without adding any coloring.
- Prepare for Piping: Spoon the pudding from each bowl into individual zip-top bags to use as piping bags; seal the bags securely.
- Cut Piping Tips: Snip a small corner off the end of each bag to create a piping tip for controlled dispensing.
- Pipe Red Layer: Carefully pipe the red pudding into the popsicle molds to fill about one-third of each mold.
- Pipe White Layer: Follow by piping the white pudding layer on top of the red, filling the next third of the mold.
- Pipe Blue Layer: Complete each mold by piping the blue pudding on top, filling to the top.
- Insert Lids and Sticks: Place the lids on the popsicle molds securely, inserting the sticks into their slots.
- Freeze: Place the molds on a flat surface in the freezer and freeze for at least 4 hours until fully set.
- Unmold and Serve: Gently remove the popsicles from the molds and serve immediately for a refreshing and colorful treat.
Notes
- Make sure not to overfill the molds to prevent overflow when layering the puddings.
- If pudding is too thick to pipe easily, whisk in a little extra milk to loosen it before piping.
- The puddings need ample freezing time to set properly—at least 4 hours is recommended.
- Use whole milk for the creamiest texture; low-fat milk may reduce creaminess.
- For easier unmolding, briefly run warm water on the outside of the popsicle molds.