If you’re on the hunt for a delightful, festive treat that doubles as a fun activity, the St Patrick’s Day Edible Rainbow Craft Recipe is your new best friend. This vibrant, playful creation brings together cheerful colors and sweet flavors in a way that’s perfect for celebrating St Patrick’s Day with kids or the young at heart. Not only does it brighten up your day, but it also makes crafting with edible elements a joyful, memorable experience that everyone can enjoy biting into afterward!
Ingredients You’ll Need
Gathering simple, everyday ingredients is part of the charm of this recipe. Each component plays a vital role: from the crispy, colorful cereal forming the vibrant rainbow to the sweet, sticky icing that holds everything in place. These ingredients are easy to find and require minimal prep but deliver maximum fun and flavor.
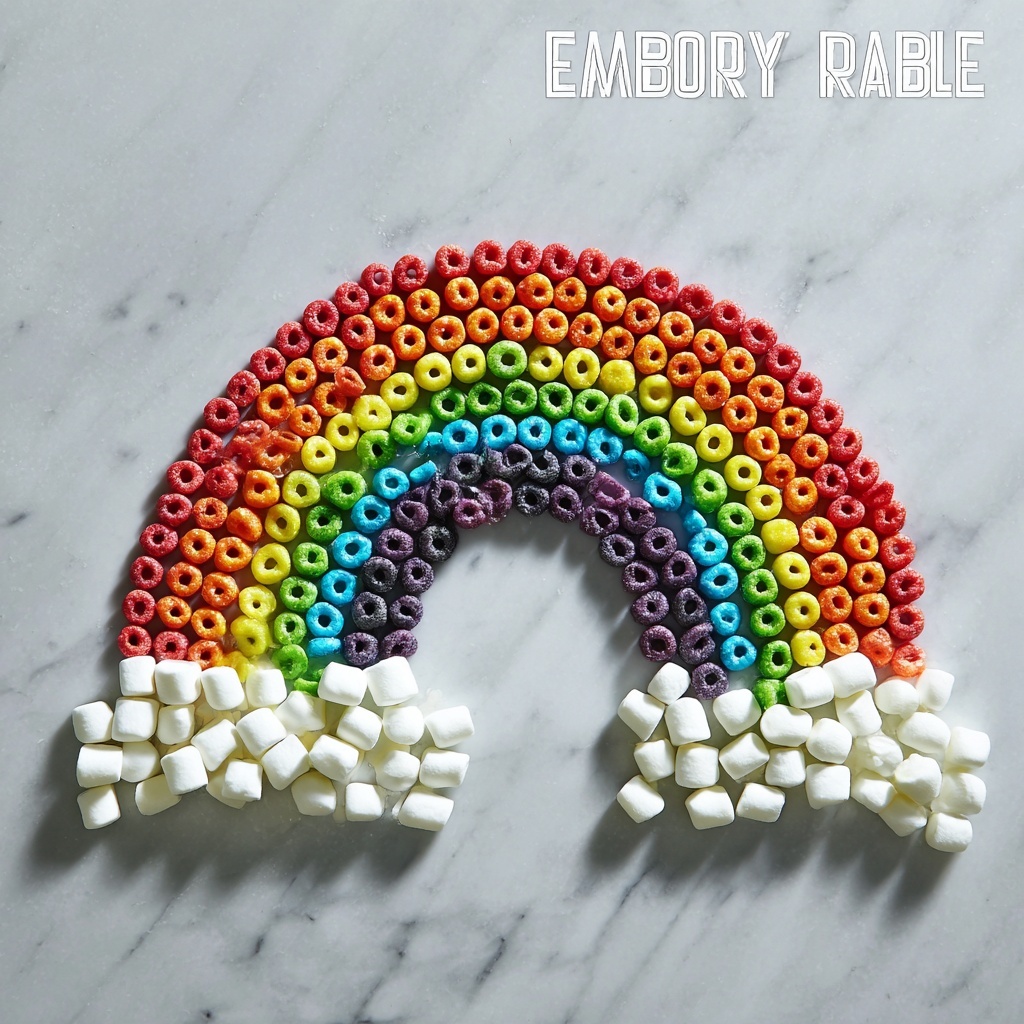
- Fruit loops separated into like colors: The foundation of your rainbow, providing bright, eye-catching colors and a crunchy texture.
- 1 cup mini marshmallows: These fluffy white clouds sit at the ends of the rainbow, adding a soft, chewy contrast.
- 1 cup powdered sugar: Essential for creating the sweet glaze that acts like edible glue to keep your craft intact.
- 1 tablespoon milk: Mixed with powdered sugar, this makes a smooth icing perfect for sticking everything together.
How to Make St Patrick’s Day Edible Rainbow Craft Recipe
Step 1: Color Sorting Fun
Start by having the kiddos or yourself separate the fruit loops into groups by color. This step isn’t just practical; it’s part of the magic that builds anticipation as you watch the rainbow come alive.
Step 2: Mixing the Icing Glue
In a small bowl, combine your powdered sugar and milk, stirring until smooth. Then transfer this sweet mixture into a pastry bag or simply a sandwich bag with a corner cut off. This mixture will act as the glue that bonds your rainbow together.
Step 3: Creating the Rainbow Arc
On a piece of wax paper, squeeze a half-circle line of icing to outline your rainbow’s shape. Carefully press the red fruit loops onto the icing line. Repeat this for each color, forming vibrant arches that make the classic rainbow pattern recognizable and beautiful.
Step 4: Anchoring the Rainbow Ends
Squeeze a big circle of icing at each end of your rainbow arch. These icing circles will hold the marshmallows, which represent the fluffy clouds at the rainbow’s base and add a delightful extra sweet bite.
Step 5: Adding Marshmallow Clouds
Gently place mini marshmallows onto the icing circles at each end. Let the entire craft dry and set so everything stays in place, then you’re ready to enjoy your colorful creation!
How to Serve St Patrick’s Day Edible Rainbow Craft Recipe
Garnishes
Consider dusting a light sprinkle of edible glitter or colorful sprinkles over the marshmallows for an extra sparkly touch that makes your edible rainbow pop even more. It’s an extra step that’s easy to do and sure to impress!
Side Dishes
Pair your edible rainbow with a simple glass of milk or a fresh fruit smoothie to keep the mood light and fresh. Adding something cool and creamy complements the sweetness and offers a refreshing balance.
Creative Ways to Present
This St Patrick’s Day Edible Rainbow Craft Recipe shines when displayed on a plain white plate or wax paper atop a festive green tablecloth. You could also place each rainbow on a popsicle stick before assembling to create edible rainbow pops, making it even more fun for kids.
Make Ahead and Storage
Storing Leftovers
If you have leftovers (though that’s rare!), store your edible rainbow craft in an airtight container at room temperature to keep the cereal crunchy and marshmallows soft. Avoid refrigeration as it can make the cereal soggy.
Freezing
This craft is best enjoyed fresh, so freezing is not recommended because the texture of the cereal and marshmallows will change and lose their charm.
Reheating
Since this is a no-bake craft, reheating is unnecessary. Just enjoy it straight from the container or storage spot to keep the colors vibrant and flavors fresh.
FAQs
Can I use other cereals besides Fruit Loops?
Absolutely! While Fruit Loops offer bright colors perfect for the rainbow, you can substitute with any colorful cereal you like. Just make sure it holds its shape well.
Is this recipe suitable for kids?
Definitely! This craft is designed with kids in mind. It’s simple, safe, and a fantastic way to get them involved in festive creativity.
How long does it take for the icing to dry?
Typically, the icing will set within 20–30 minutes at room temperature, depending on humidity. You want it firm enough to hold everything together but not too hard that it’s brittle.
Can I make this craft vegan?
You can! Use vegan marshmallows and substitute milk with a plant-based alternative. Just ensure your powdered sugar doesn’t contain bone char, and you’re good to go.
What’s the best way to clean up after this craft?
Use a damp cloth to wipe down surfaces and encourage little helpers to wash their hands. Keep some wipes handy for any sticky fingers, and you’ll have a smooth cleanup process.
Final Thoughts
There is something truly joyful about creating with edible colors and textures, especially when it’s tied to a festive celebration like St Patrick’s Day. The St Patrick’s Day Edible Rainbow Craft Recipe combines imagination, sweetness, and a burst of happiness into one wonderful project that’s as delightful to make as it is to eat. Give it a try next time you want a little creative fun combined with a tasty treat to brighten your day!
Print
St Patrick’s Day Edible Rainbow Craft Recipe
- Prep Time: 20 minutes
- Cook Time: 0 minutes
- Total Time: 20 minutes
- Yield: 4 servings
- Category: Snack, Craft
- Method: No-Cook
- Cuisine: American
- Diet: Vegetarian
Description
Create a fun and colorful St. Patrick’s Day edible rainbow craft using simple ingredients like Fruit Loops cereal, mini marshmallows, and a sweet powdered sugar glue. This easy no-cook activity is perfect for kids and results in a delightful rainbow treat that’s as playful as it is tasty.
Ingredients
Rainbow Craft Supplies
- Fruit Loops cereal, separated into color groups (red, orange, yellow, green, blue, purple)
- 1 cup mini marshmallows
- 1 cup powdered sugar
- 1 tablespoon milk
Instructions
- Separate Cereal Colors: Have the kids sort the Fruit Loops cereal into separate piles based on color. This will make it easier to create the rainbow colors in order.
- Prepare Icing Glue: In a small bowl, combine the powdered sugar and milk. Stir until smooth to create a thick icing that acts as edible glue. Transfer this mixture to a pastry bag or sandwich baggie with one corner snipped off for easy piping.
- Outline Rainbow Shape: On a sheet of wax paper, pipe a line of the icing in a half-circle shape. This will serve as the base outline for your rainbow.
- Place Fruit Loops: Carefully place the red Fruit Loops onto the icing line, followed by the other colors in order (orange, yellow, green, blue, purple), forming the rainbow arcs. Repeat this for each color row.
- Create Cloud Bases: Squeeze icing all over in big circles at both ends of the rainbow to form clouds.
- Add Mini Marshmallows: Press mini marshmallows onto the icing clouds, covering them completely. Allow the icing to dry and set, which will hold the cereal and marshmallows in place.
- Enjoy Your Edible Rainbow: Once dry, carefully peel the wax paper away. Your St. Patrick’s Day edible rainbow craft is ready to eat and enjoy as a fun, festive treat!
Notes
- For best adhesion, let the icing dry at room temperature for at least 30 minutes before moving your rainbow.
- You can substitute Fruit Loops with any other colorful cereal if preferred.
- This craft is best done on a flat surface and supervised especially when working with young children.
- Use wax paper to prevent sticking and easy cleanup.


